Disclaimer: the information provided on this page is given as is, i.e. without warranty that you will not break your system following it. Additionally, do not expect to get support and warranty from NETGEAR if this happens.
This page documents some efforts to get a recent kernel and latest Debian system running on NETGEAR ReadyNAS Duo v2, instead of the original (Marvell/NETGEAR-patched 2.6.31.8) kernel and custom system. The efforts was started at the beginning of 2013 on 3.7 kernel, and completed on September 2013 with the release of 3.11 kernel. The major changes pushed in mainline kernel (via commits 4a9f4c7f, 594fbe71, 6bd98481, f236f5aa) are
- a specific .dts file (arch/arm/boot/dts/kirkwood-netgear_readynas_duo_v2.dts)
- a driver to support G762 PWM fan controller (drivers/hwmon/g762.c) and associated documentation
Note that if you are looking for a server similar to the ReadyNAS Duo v2 but with an ARMv7 processor (i.e. with NX bit support), I recently bought a NETGEAR ReadyNAS 102 (update of Duo v2) and did the same work to get a recent kernel and Debian running on it. I started a page dedicated to that work.
If you have comments, corrections, additional information I missed or problems w/ this page, do not hesitate to drop me a mail. Note that everything (from hardware specs to debian and kernel install) has been kept on a single page to have all the information available in a single location and be able to make a PDF out of it.
Here is the main table of contents for the page, with links to the various sections of the page.
- Changelog for this page
- Remaining work in progress, i.e. TODO list
- Hardware specs
- Step by step kernel build
- Step by step Debian install
- Notes on PaX/grsec support
- Automatic fan control based on NAS temperature
- Configuring custom actions for buttons
Changelog i.e. work done
- October 2014: Added a basic script to associate actions to power, reset and backup buttons.
- September 2013: work completed!: even if the todo list below still has some minor remaining entries, mainline kernel now includes everything necessary to boot on ReadyNAS Duo v2. Enhanced this page to document 3.11 kernel build and Debian install from scratch. Added fancontrol related section.
- July 2013: patch accepted upstream to reference G762 PWM fan controller in ReadyNAS Duo v2 .dts file
- June 2013: patch accepted upstream for G762 PWM fan controller support.
- May 2013: patch accepted upstream for PCIe init via DT.
- April 2013: made a local copy of a more detailed specification for GMT G762 PWM fan controller.
- March 2013: documentation for serial pins layout (VCC,TX,RX,GND) and console access. Working USB 3.0 ports on 3.8 kernel (added initialization code in board setup file). Documented step by step install of Debian and 3.8.3 kernel. Split of kernel patches (readynas support, defconfig, G762 driver, thermal driver and CESA DMA) to prepare publication. Some notes on PaX/grsec (in)abilities for the device. LED and buttons are not supported. Patch pushed upstream and accepted.
- February 2013: publication of this page w/ detailed hardware specs including pictures and datasheets when available, and additional information on support status. Full conversion to falttened device tree (FDT). Support of SoC temperature sensor.
- January 2013: started working on Marvell/NETGEAR-patched 2.6.31.8 kernel to extract patches and gather information on hardware. First boot of a custom 3.7.6 kernel.
Todo list i.e. work in progress
-
Work on buttons -
Work on LED -
Fix halt process (at the moment, it reboots) -
Work on temperature sensors -
Work on DT version -
Split patches - Document method to recover NETGEAR-specific patches
-
Work on mpp config -
Push a first set of patches upstream for comment -
Work on userland (sensors config for temperature and fan) -
Document Debian install from scratch -
Build a list of unsupported hardware parts -
Document grsec/PaX limitations (ARMv5 lacks NX support) - Give a summary of network/system performance
-
Write initial doc for XOR and cryptographic (CESA) engines -
Add info on serial pins (VCC, RX, TX and GROUND) -
Document ATMEL AT25F512B-SSH purpose -
Fix missing USB 3.0 (rear) ports init code -
Update/clean LaCie G762 driver for publication and perform DT conversion -
Improve css for this page -
HTML/CSS validator for this page - Document loading uImage and uInitramfs from USB (instead of tftp)
Hardware specs
This section is dedicated to the hardware specs of the NETGEAR ReadyNAS Duo v2. It is based on visual inspection of Duo v2 main board and two daughter boards, completed with reading of NETGEAR 2.6.31.8 kernel sources and publicly available (read Google-gathered) information .
When available, additional information and software handling details are given for each hardware part. For instance, if you are looking for informations related to the fan controller, simply click the link above to get the details of what is used and how support is provided.
Each picture available on this page is a thumbnail of a larger picture. The larger one can be accessed by clicking the thumbnail.
If you are in a hurry looking for a specific info, you can use this table of contents to directly access information on a specific hardware part of the system or get an overview of what a NETGEAR ReadyNAS Duo v2 is made of.
- Marvell SoC 88F6282 ARMv5TE @1.6Ghz
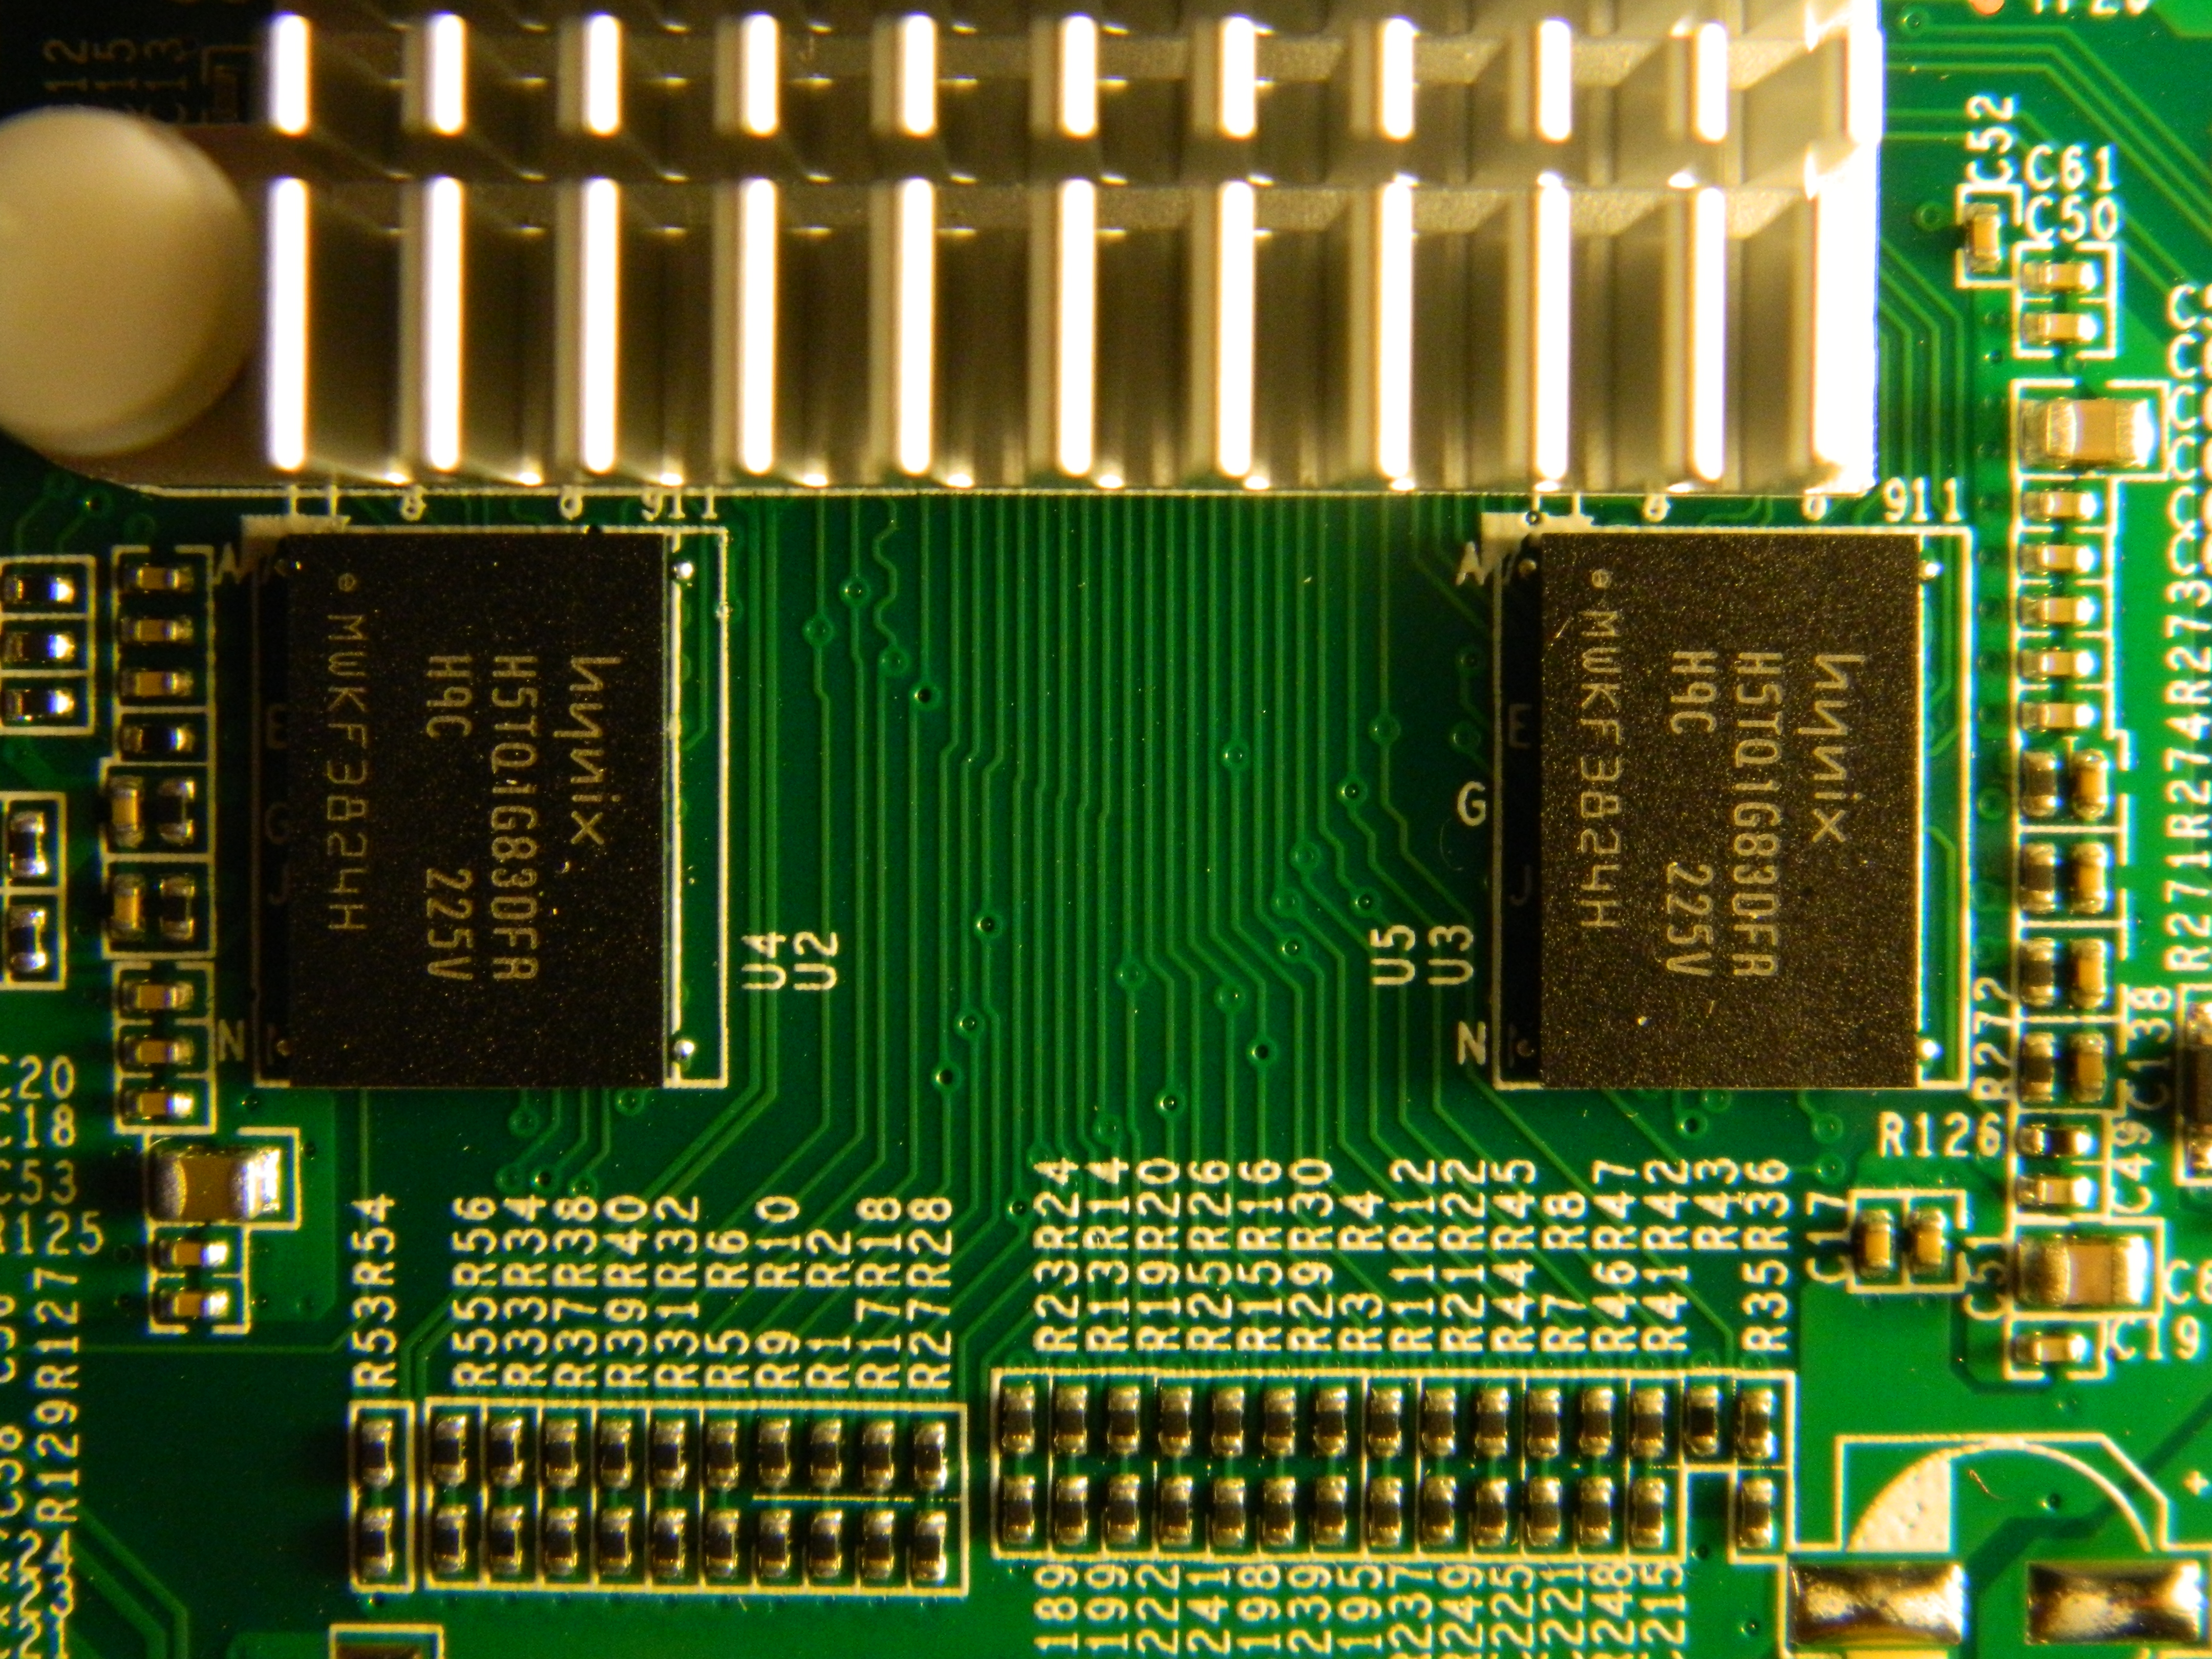
- 256 MB RAM via 2x128 Hynix DDR3 @1333Mhz
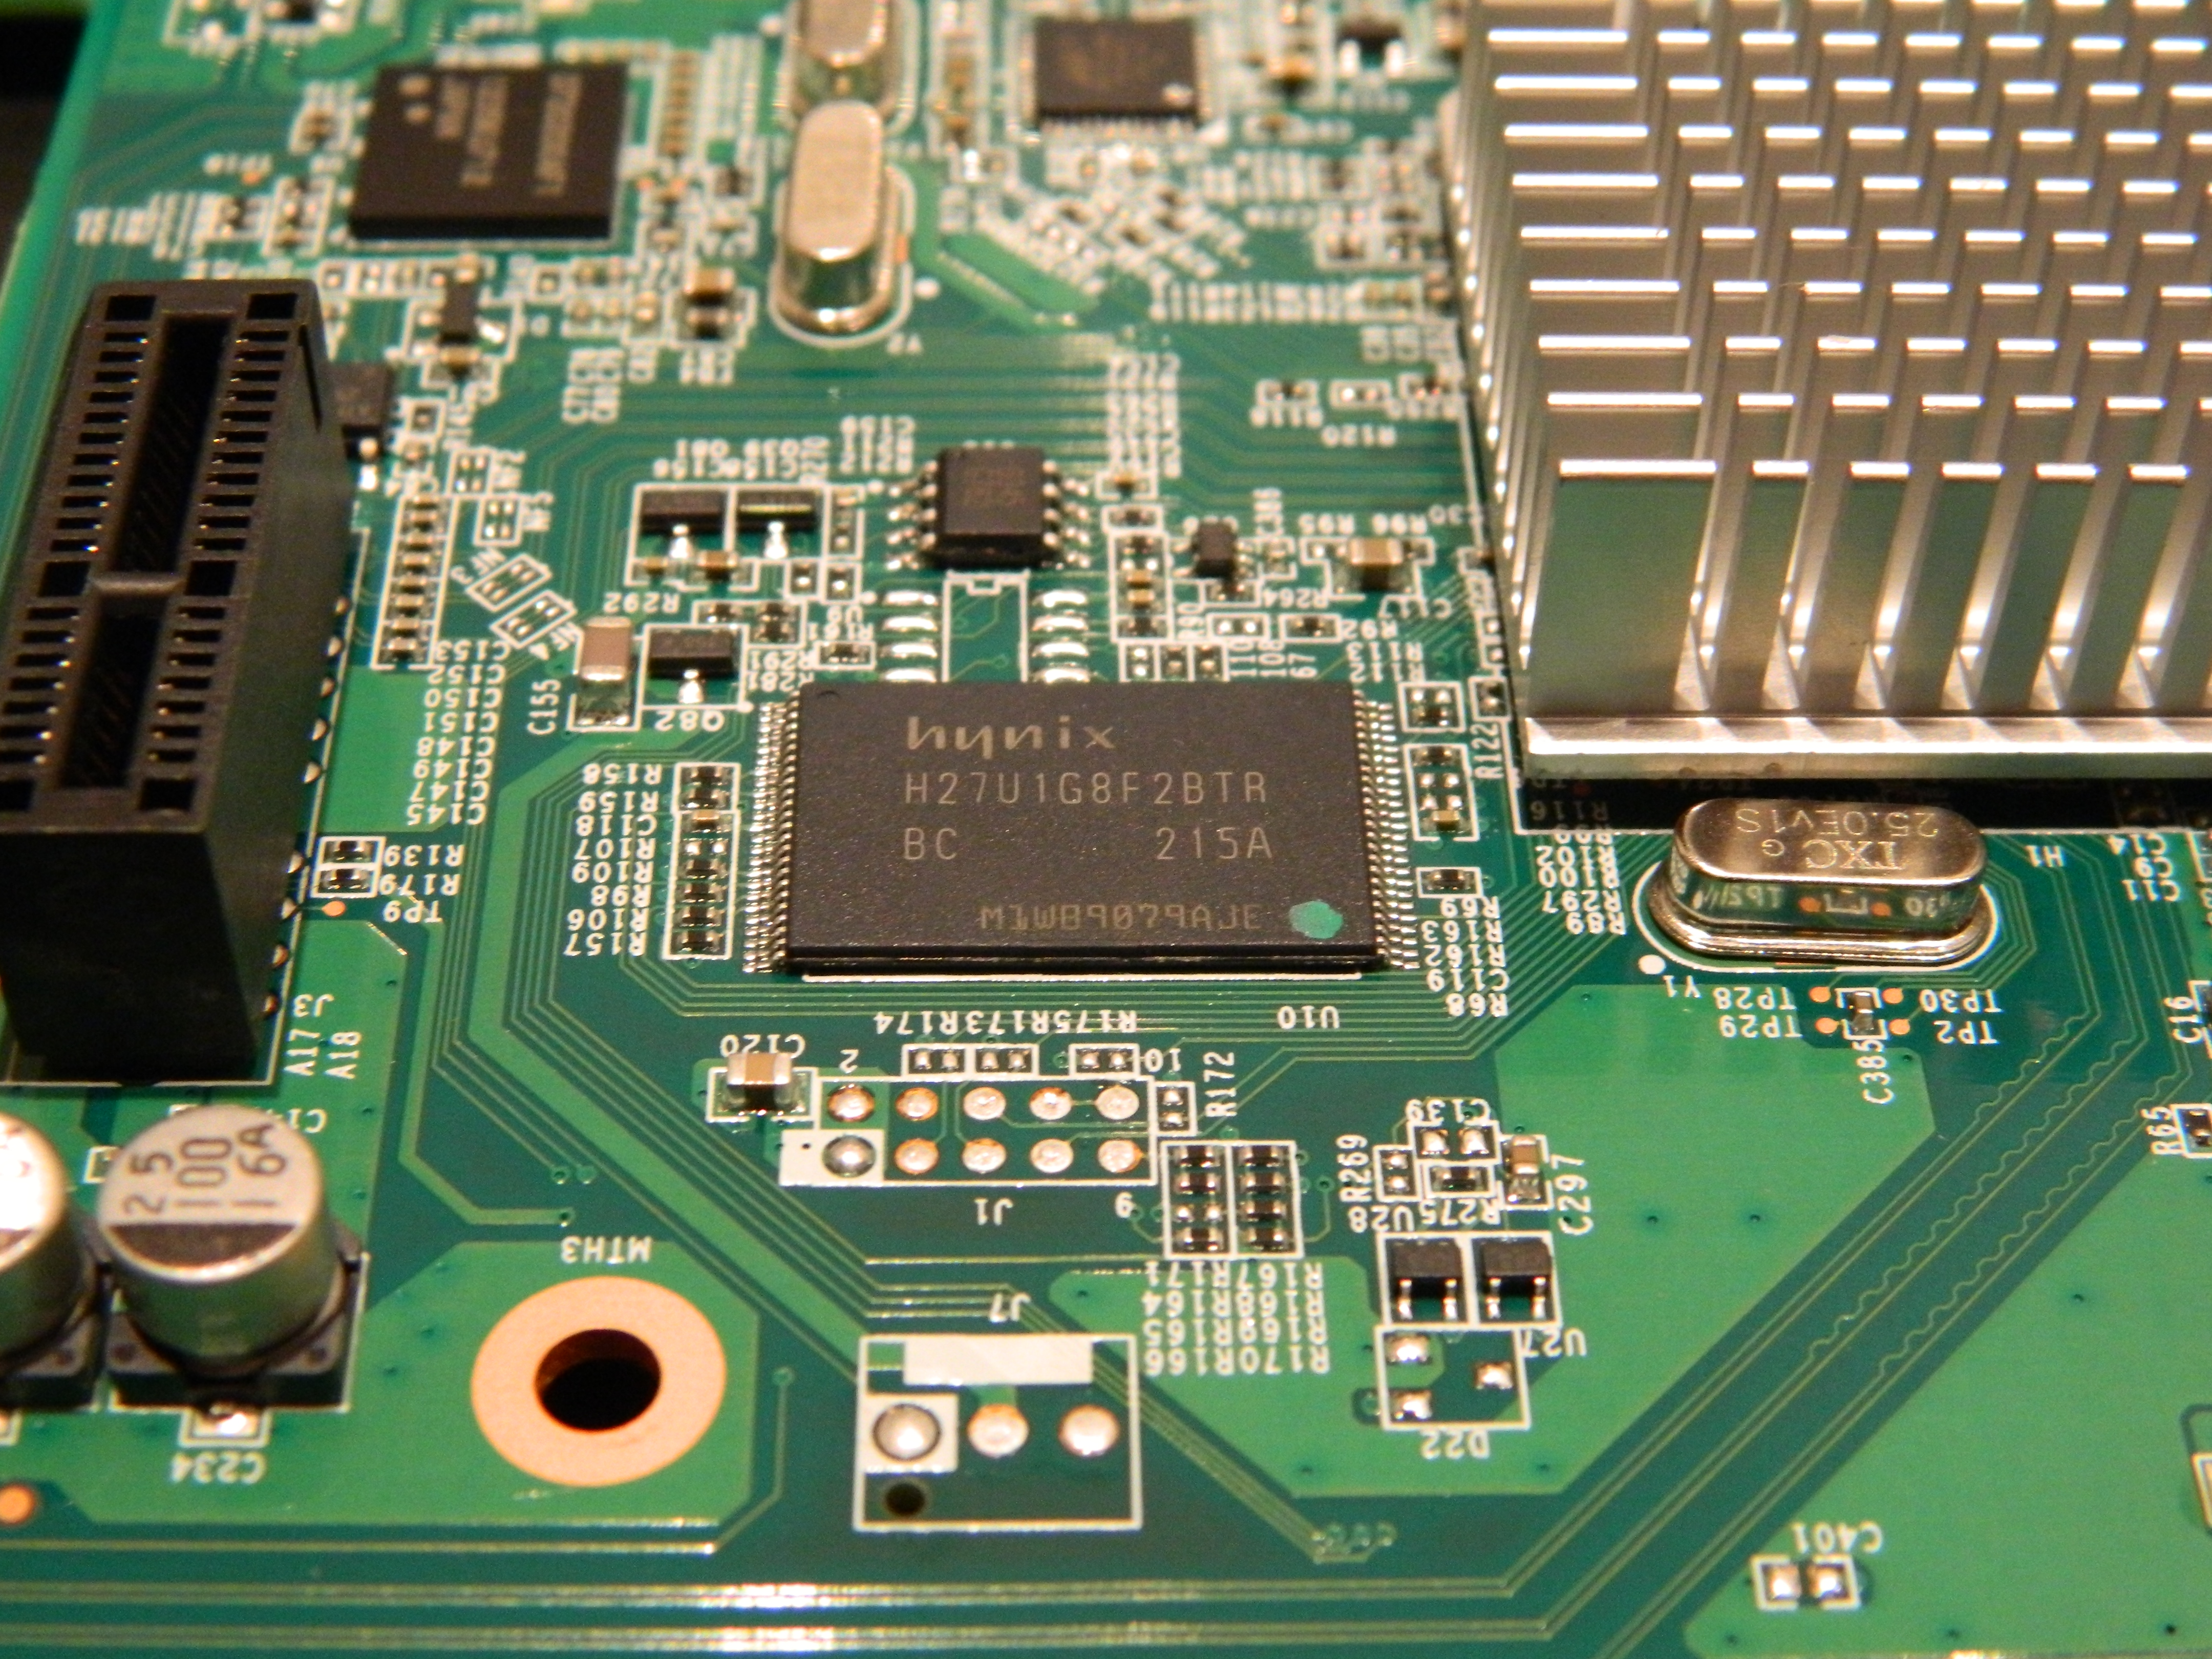
- 128 MB Hynix NAND Flash
- Serial interface via 16550A UART
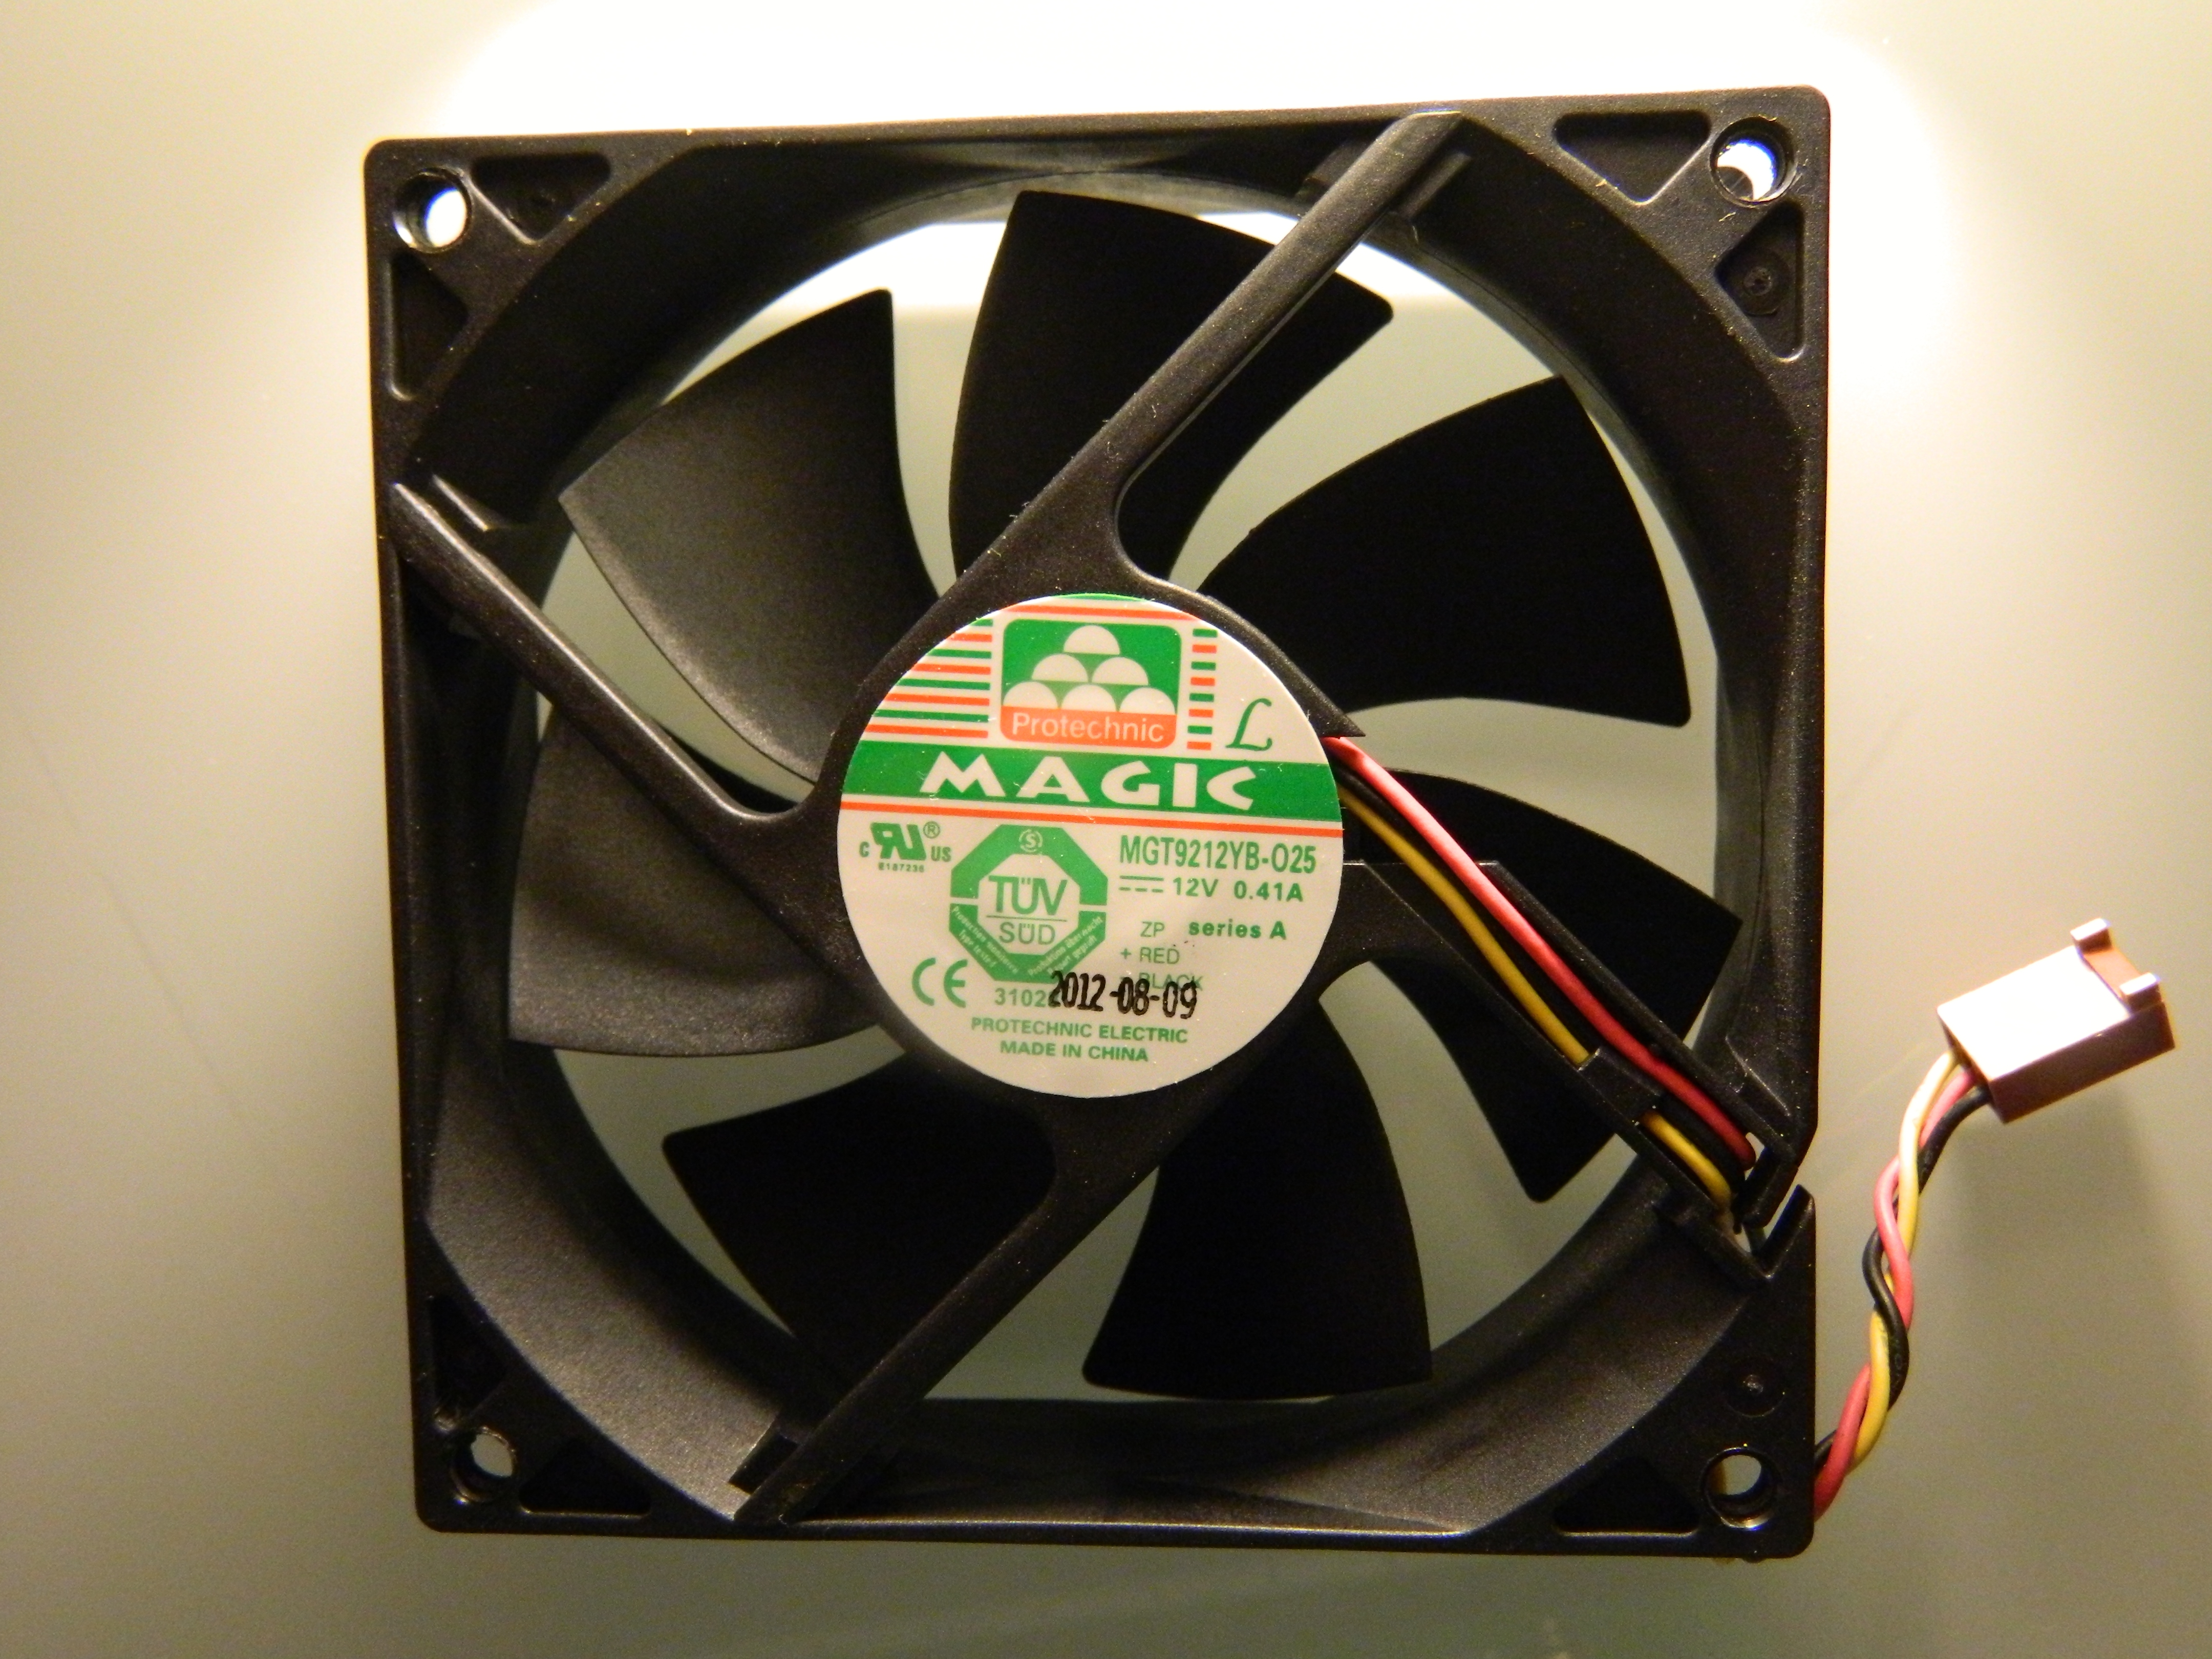
- Protechnic Electric Co MG9212YB-25 Fan
- GMT G762 PWM Fan Controller
- Ricoh RS5C372A I2C bus RTC
- NEC/RENESAS µPD720200 USB3.0/xHCI host controller
- Nuvoton 3012S
- SoC Temperature sensor
- Marvell 88E1318 Gigabit Ethernet PHY
- ATMEL 512 Kb SPI Flash
- CR2032 battery
- FDS 4435BZ
- FDS 8984
- JTAG provision
- Marvell G47B
- Richtek RT8105
- Texas instruments TPS65251
- Leds and buttons
- Marvell Cryptograpic Engine and Security Accelerator (CESA)
- DMA/XOR engine
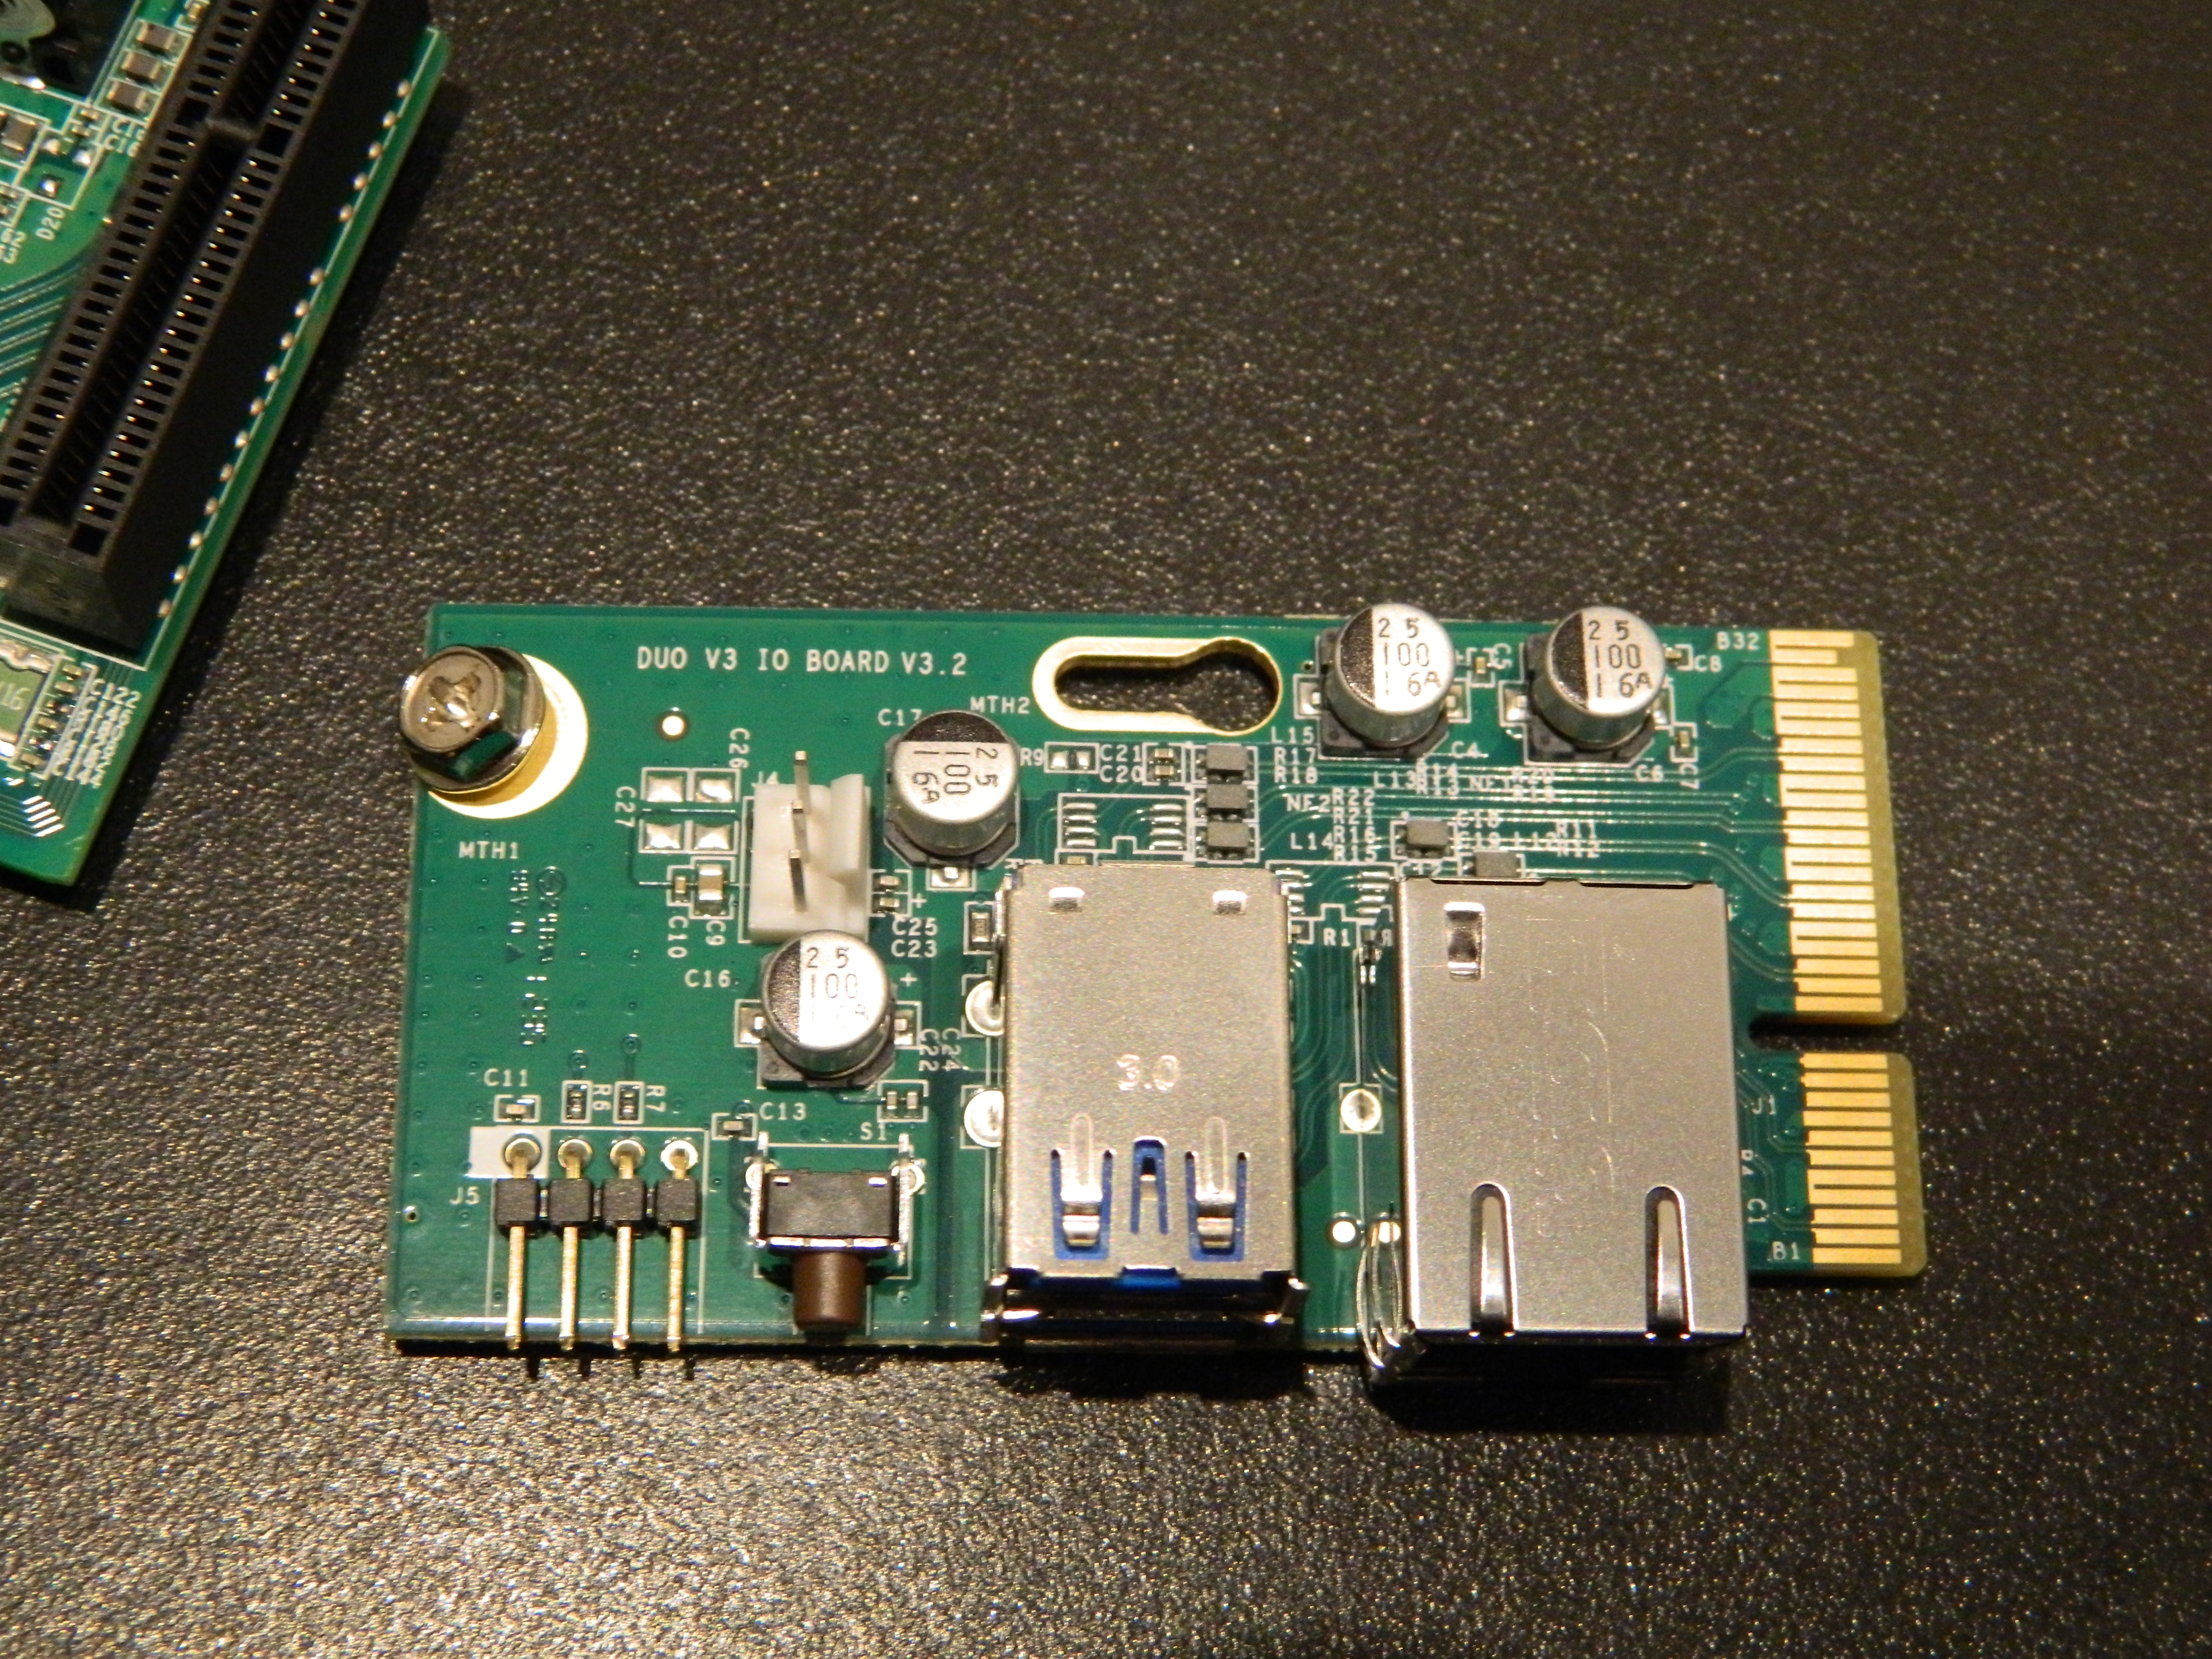
The picture below provides an overview of NETGEAR ReadyNAS Duo v2 main board. At the rear of the board, from left to right on the picture are connectors for two daughter boards, respectively supporting the SATA connectors for the first (DUO V3 BP BOARD V3.0), and the two USB 3.0 ports, the RJ45 connector, the reset button, the serial pins, and the power connector for the main fan for the second (DUO V3 IO BOARD V3.2).
If you wonder why the NAS is called Duo v2 (v1 was its SPARC-based ancestor) but the board are marked DUO V3 (sources also have that mention), ... I do not have an answer.
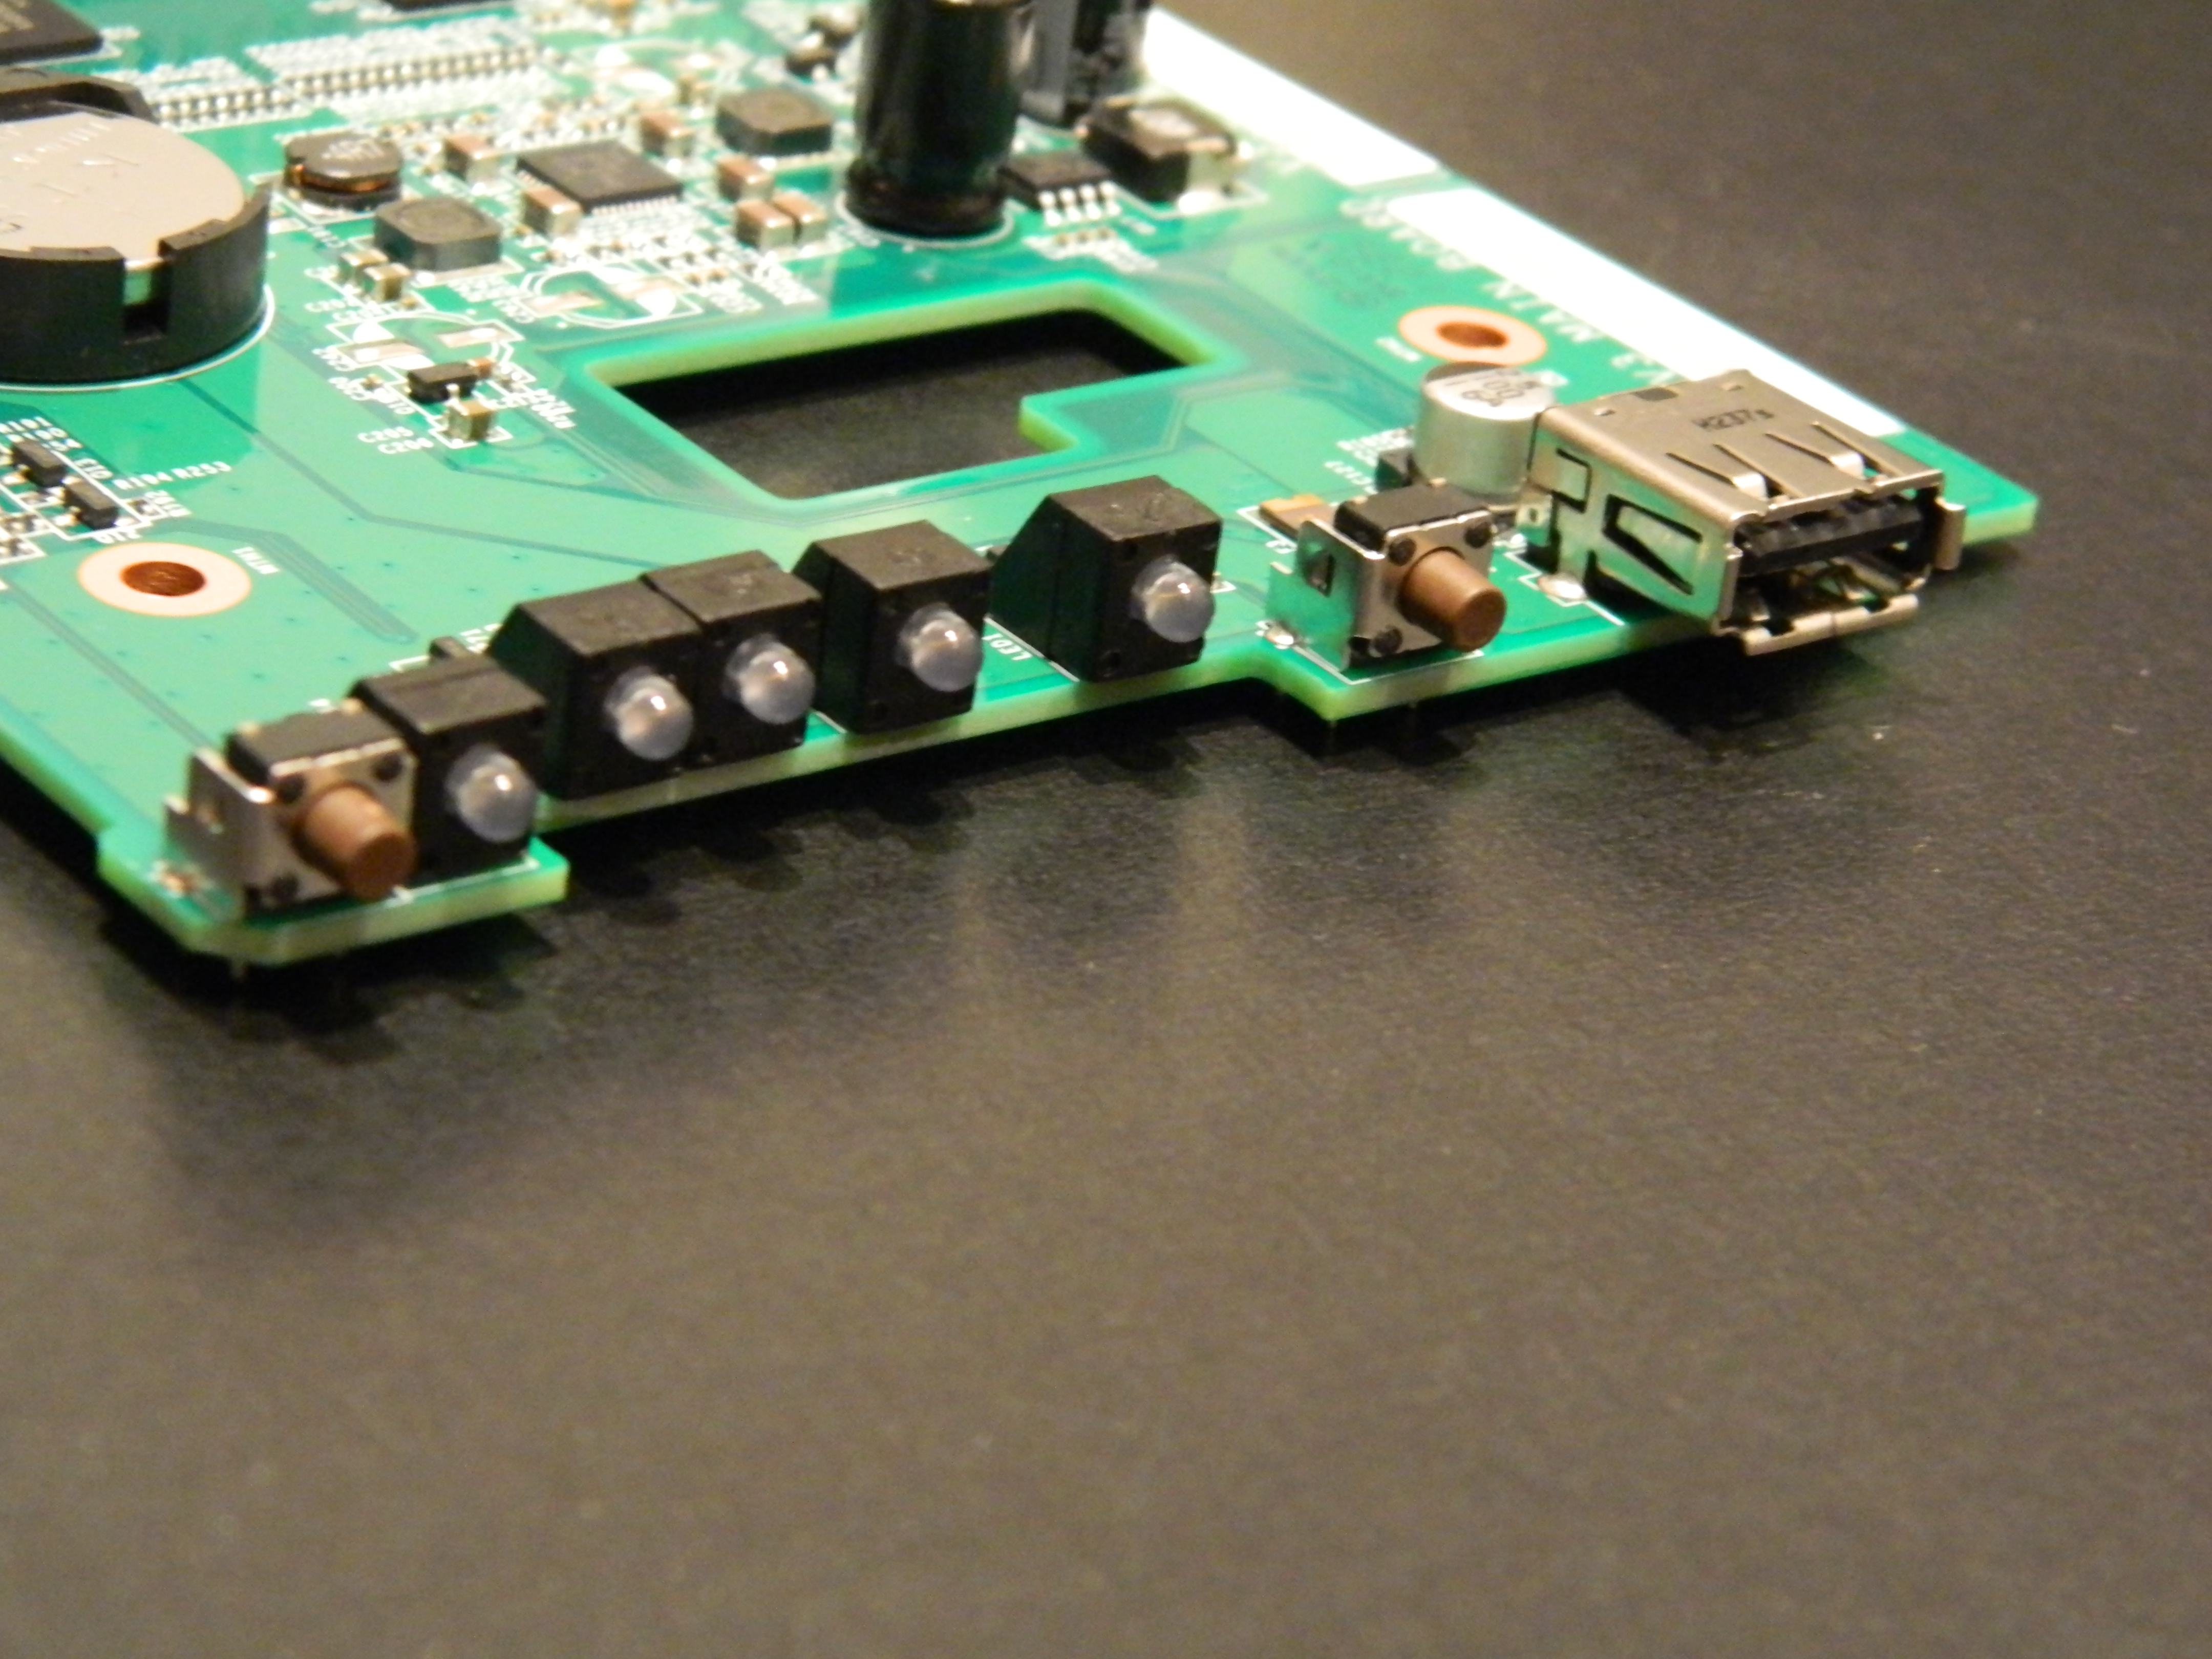
On the main board, the various buttons and LEDs are located near the front USB 2.0 port. The Marvell SoC is located at the center of the board, mask by its heat sink.

The two pictures below respectively present the front and back of the first daughter board (DUO V3 BP BOARD V3.0), for connection of SATA disks.


The two pictures below respectively present the front and back of the second daughter board (DUO V3 IO BOARD V3.2), for connection of SATA disks.
The following picture provides a view of the two daughter boards at their original location at the rear of the device (main board has been removed).

SoC
The ReadyNAS Duo v2 runs a Marvell 82F6282 SoC (aka ARMADA 300) from Kirkwood family. This SoC integrates a single core ARMv5TE-compatible CPU running at 1.6GHz (Marvell also has 1.8 and 2GHz versions). If you want to read on the subject, here are some locally cached documents:
root@hal:~# cat /proc/cpuinfo
Processor       : Feroceon 88FR131 rev 1 (v5l)
BogoMIPS        : 1599.07
Features        : swp half thumb fastmult edsp
CPU implementer : 0x56
CPU architecture: 5TE
CPU variant     : 0x2
CPU part        : 0x131
CPU revision    : 1

Hardware        : Feroceon-KW
Revision        : 0000
Serial          : 0000000000000000
Hynix H5TQ1G83DFR-H9C
Two 128MB DDR3 1333 Hynix H5TQ1G83DFR-H9C chips are connected to the SoC. As you may have noticed, those chips are soldered on the board, i.e. not upgradable. Local copies of Hynix H5TQ1G83DFR specs are available.
Hynix H27U1G8F2BTR
The ReadyNAS Duo comes with 128MB of NAND flash. The chip is a Hynix H27U1G8F2BTR. If you want to get more details, the Hynix NAND flash part number decoding document is woth reading.
Protechnic Electric Co MG9212YB-25 Fan
The ReadyNAS cooling is performed by a 92mmx92mmx25mm Protechnic Electric CO MG9212YB-25 Fan. This fan is connected to the second daughter board.
GMT G762 Fan controller
Previous FAN is controlled by a G762 Fan controller from Global Mixed-mode Technology Inc. The G762 has many similarities with the G760a, for which support is available in upstream kernel. For those interested by the details of the device, I keep a local copy of a more detailed datasheet for the G762/G763 fan controller than the one available on GMT site.

A driver for G762 has been developed by LaCie for some of its NASes based on existing G760a driver code. Even though the driver is published under a GPLv2 license, it is currently not available in upstream kernel. Nonetheless, with minor adaptations, it integrates perfectly in current 3.8 kernel tree and allowed me to control the rotation of the fan. After quite some work with this driver as a basis, I managed to get it merged upstream in 3.11. Here is what you get on a 3.11 kernel:
root@hal:~# uname -a
Linux hal 3.11.0.duov2 #1 Sun Sep 8 00:01:11 CEST 2013 armv5tel GNU/Linux
After having installed lm-sensors package, we get:
root@hal:~# sensors
g762-i2c-0-3e
Adapter: mv64xxx_i2c adapter
fan1:        2082 RPM  (div = 1)

kirkwood_thermal-virtual-0
Adapter: Virtual device
temp1:        +36.7°C

root@hal:~# sensors -u
g762-i2c-0-3e
Adapter: mv64xxx_i2c adapter
fan1:
  fan1_input: 2275.000
  fan1_alarm: 0.000
  fan1_fault: 0.000
  fan1_div: 1.000
  fan1_pulses: 2.000

kirkwood_thermal-virtual-0
Adapter: Virtual device
temp1:
  temp1_input: 36.697

root@hal:/sys/bus/i2c# ls drivers
dummy  g762  rtc-rs5c372

root@hal:/sys/bus/i2c/devices/0-003e# ls
driver      fan1_div    fan1_target  modalias  pwm1         pwm1_mode  uevent
fan1_alarm  fan1_input  hwmon        name      pwm1_enable  subsystem
By playing with fan1_input et fan1_target, we can indeed modify the speed of the fan and collect its value:
root@hal:/sys/bus/i2c/devices/0-003e# echo 2700 > fan1_target
root@hal:/sys/bus/i2c/devices/0-003e# cat fan1_input
2700
root@hal:/sys/bus/i2c/devices/0-003e# echo 1500 > fan1_target
root@hal:/sys/bus/i2c/devices/0-003e# cat fan1_input
2433
root@hal:/sys/bus/i2c/devices/0-003e# cat fan1_input
2048
root@hal:/sys/bus/i2c/devices/0-003e# cat fan1_input
2048
root@hal:/sys/bus/i2c/devices/0-003e# cat fan1_input
1780
root@hal:/sys/bus/i2c/devices/0-003e# cat fan1_input
1780
root@hal:/sys/bus/i2c/devices/0-003e# cat fan1_input
1606
root@hal:/sys/bus/i2c/devices/0-003e# cat fan1_input
1606
root@hal:/sys/bus/i2c/devices/0-003e# cat fan1_input
1480
root@hal:/sys/bus/i2c/devices/0-003e# cat fan1_input
1480
root@hal:/sys/bus/i2c/devices/0-003e# cat fan1_input
1507
As can be seen above, the speed progressively stabilizes to the expected value. If you are interested by a more useful setup, you can take a look at the section dedicated to automatic fan control based on NAS temperature using fancontrol package.
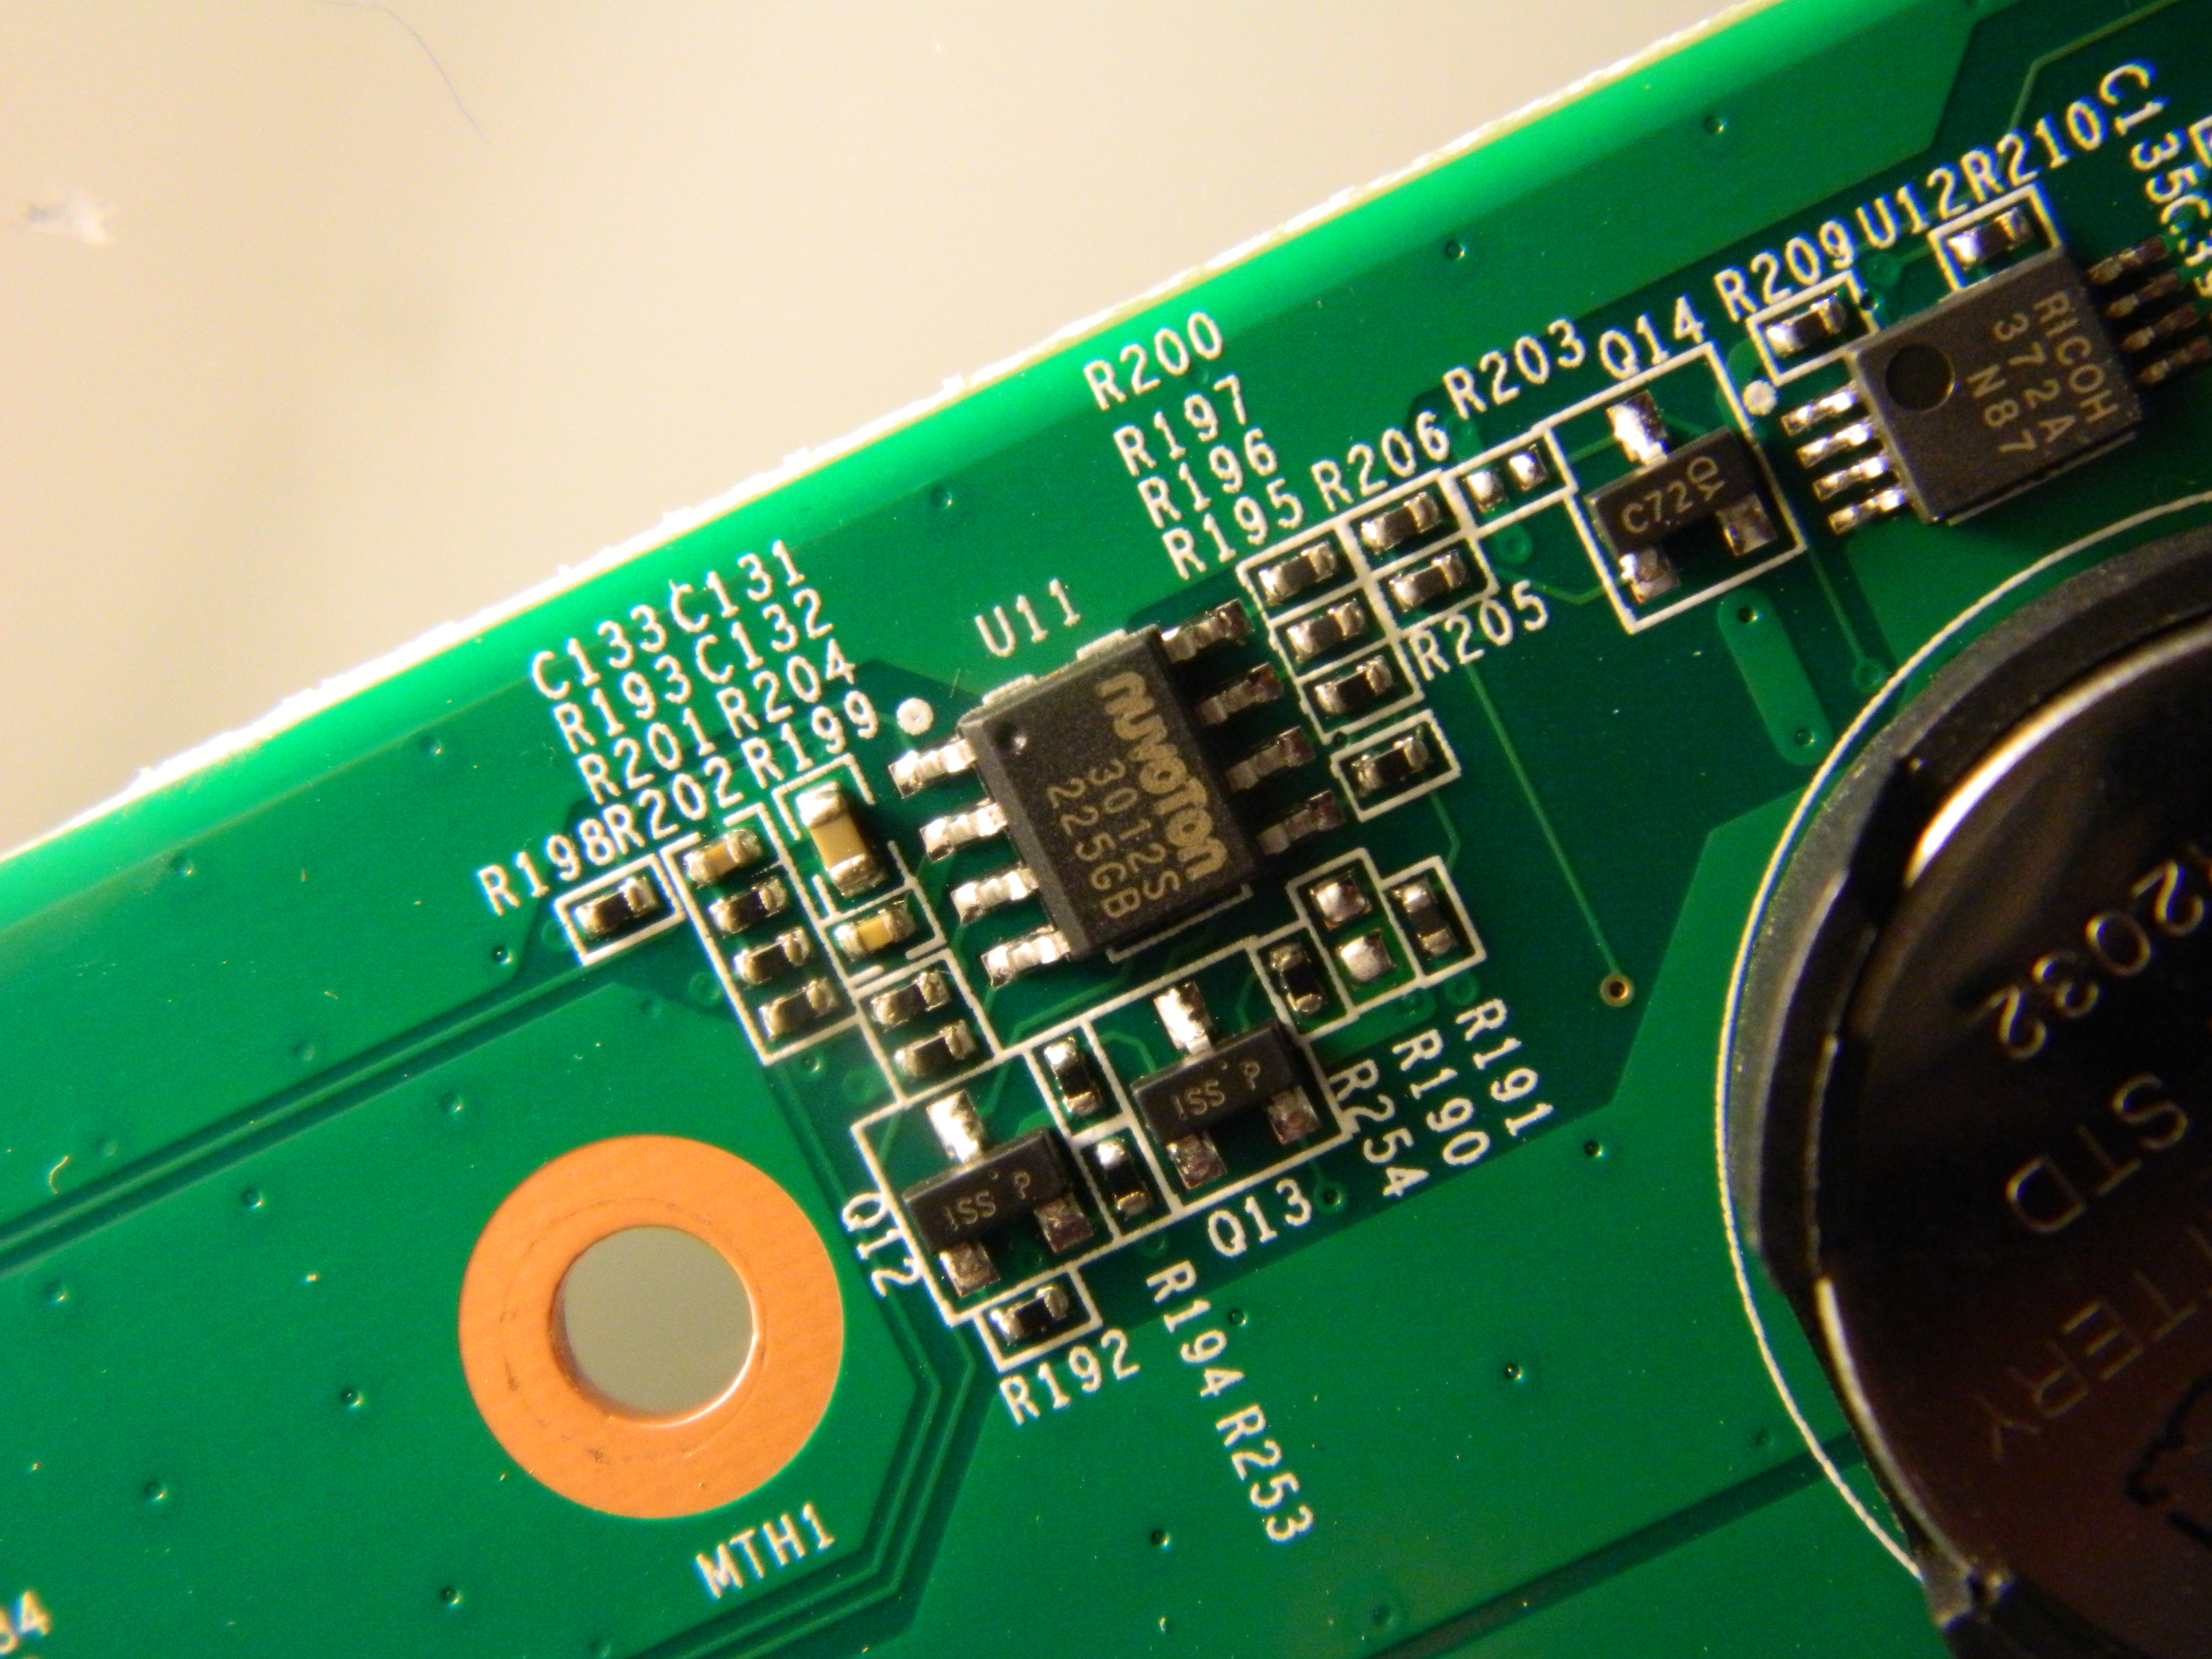
RICOH RS5C372A
The RTC of the system is provided by an I2C-connected Ricoh RS5C372A. Support for that chip is avilable in upstream kernel and is working fine.

NEC µPD720200 (D720200AF1)
The two USB3.0 ports on the rear of the NAS are provided by a NEC/RENESAS (Renesas bought NEC in 2010) µPD720200 USB 3.0 Host Controller, connected on PCIe bus. The configuration of the controller is provided by the Macronix 512 Kilobit SPI flash.
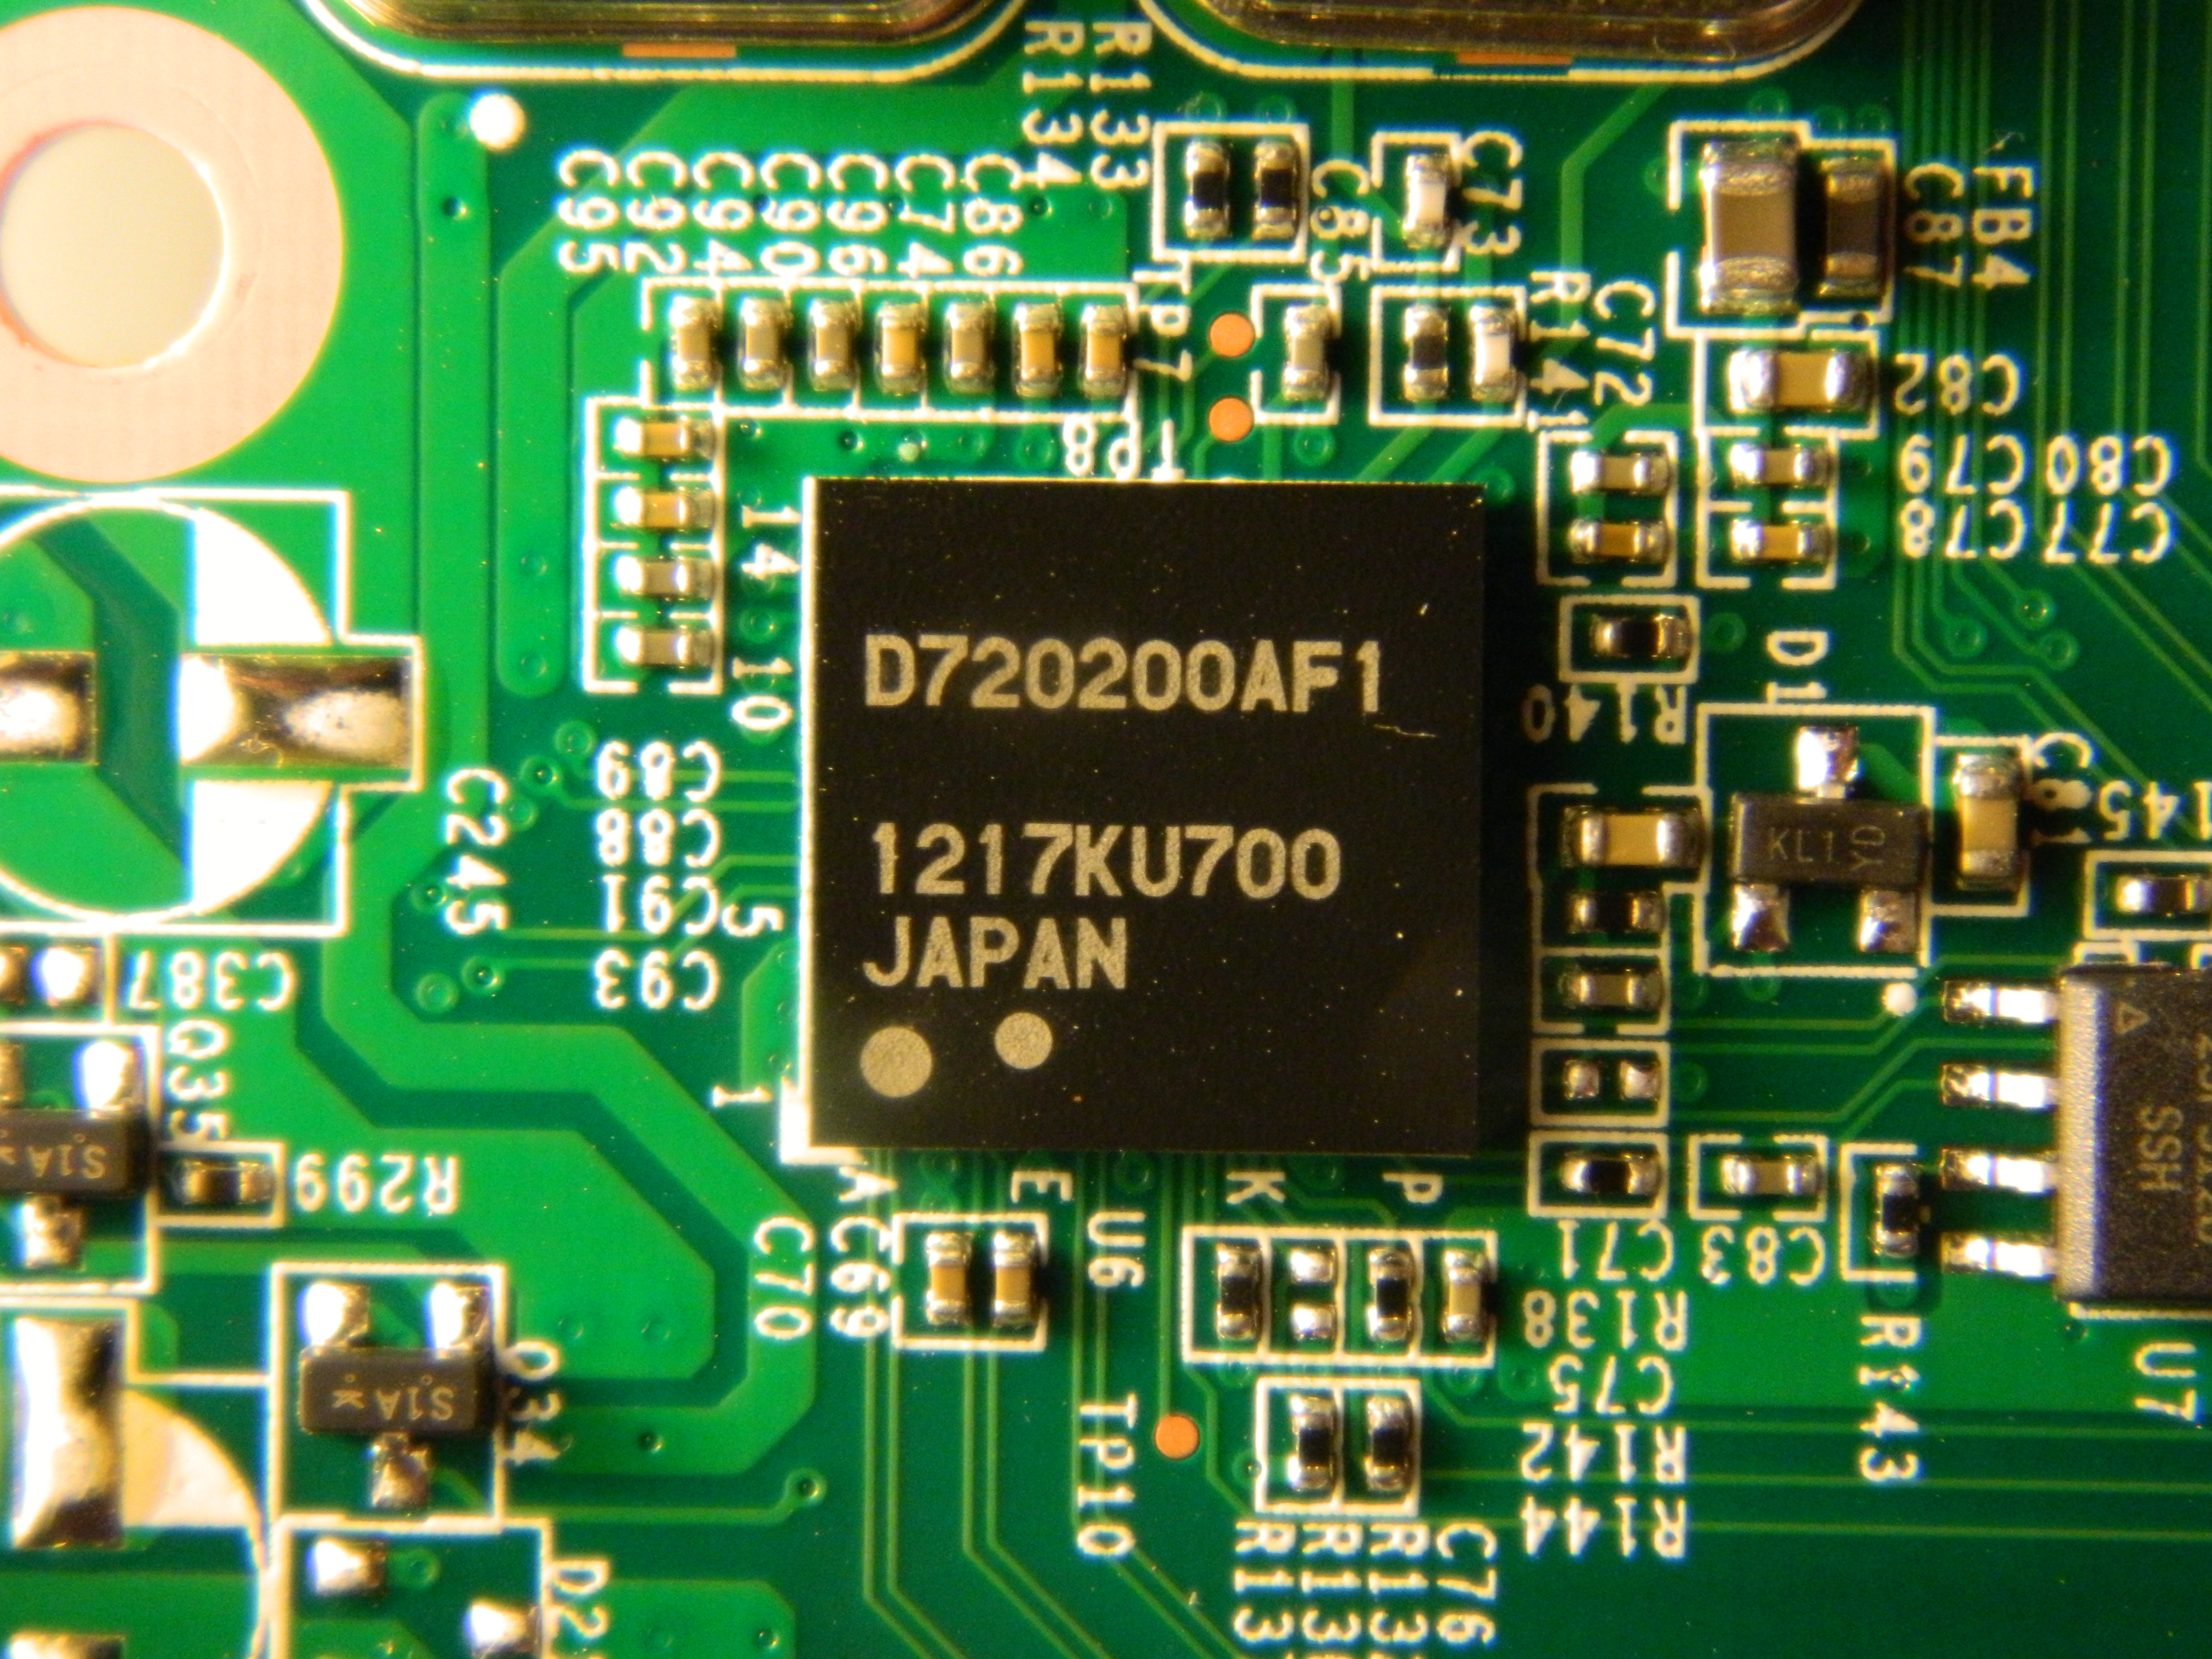
Support for the chip is available in upstream kernel. Here is what lspci -v reports on a 3.8 kernel with the driver enabled:
00:01.0 USB controller: NEC Corp. uPD720200 USB 3.0 Host Controller (rev 04) (prog-if 30 [XHCI])
        Flags: bus master, fast devsel, latency 0, IRQ 9
        Memory at e0000000 (64-bit, non-prefetchable) [size=8K]
        Capabilities: [50] Power Management version 3
        Capabilities: [70] MSI: Enable- Count=1/8 Maskable- 64bit+
        Capabilities: [90] MSI-X: Enable- Count=8 Masked-
        Capabilities: [a0] Express Endpoint, MSI 00
        Capabilities: [100] Advanced Error Reporting
        Capabilities: [140] Device Serial Number ff-ff-ff-ff-ff-ff-ff-ff
        Capabilities: [150] Latency Tolerance Reporting
        Kernel driver in use: xhci_hcd
Nonetheless, just enabling the config knob in the kernel is not sufficient: in that case plugging a simple USB key on one of the two rear ports of the device gives no result (nothing shows up in kernel logs), even though the controller is recognized (lspci presents the controller). Some initialization code is needed in board setup fiel for the port to work. As of today (March 2, 2013), USB 3.0 ports now work as expected.
Temperature sensor
Marvell 88F6282 SoC includes a temperature sensor. In Marvell 5.1.3 LSP (patches against linux 2.6.31.8 kernel on which NETGEAR kernel is based), a sensor driver is present to support the feature (/arch/arm/mach-feroceon-kw/hwmon.c, 189 lines). It provides a sysfs access to the temperature of the SoC.
It is nonetheless disabled in Netgear kernel (i.e. CONFIG_SENSORS_FEROCEON_KW is not set) and the userland on Duo v2 relies only on two other sensors to access the temperature on the enclosure: the ones included in the disks and available via smartctl.
I was about to port the drivers to 3.8 kernel when I noticed the submission of thermal sensor support for Kirkwood SoCs for upstream kernel by Nobuhiro Iwamatsu. Its set of patches has recently (2013-02-08) been applied to thermal -next tree. In the end, the patch should be availble in 3.9 kernel.
Once enabled (CONFIG_KIRKWOOD_THERMAL), the inclusion of kirkwood-6282.dtsi in NETGEAR readynas dts file, automatically provides the following information to describe how the SoC temperature sensor is supported (register, driver, status):
    thermal@10078 {
            compatible = "marvell,kirkwood-thermal";
            reg = <0x10078 0x4>;
            status = "okay";
    };
After a reboot on the new kernel, here is what is now available on the system:
root@hal:~# cd /sys/class/thermal/
root@hal:/sys/class/thermal# ls
thermal_zone0
root@hal:/sys/class/thermal# cd thermal_zone0
root@hal:/sys/class/thermal/thermal_zone0# ls
passive  policy  subsystem  temp  type  uevent
root@hal:/sys/class/thermal/thermal_zone0# ls -l
total 0
-rw-r--r-- 1 root root 4096 Feb 26 23:21 passive
-rw-r--r-- 1 root root 4096 Feb 26 23:21 policy
lrwxrwxrwx 1 root root    0 Feb 26 23:21 subsystem -> ../../../../class/thermal
-r--r--r-- 1 root root 4096 Feb 26 23:21 temp
-r--r--r-- 1 root root 4096 Feb 26 23:21 type
-rw-r--r-- 1 root root 4096 Feb 26 23:21 uevent

root@hal:/sys/class/thermal/thermal_zone0# cat type
kirkwood_thermal

root@hal:/sys/class/thermal/thermal_zone0# cat temp
28928
The final value provided by temp key is the SoC temperature in milli degrees Celsius (i.e. 28.928 °C). sensors command from lm-sensors package provides simple access to the value:
root@hal:~# sensors
g762-i2c-0-3e
Adapter: mv64xxx_i2c adapter
fan1:        2730 RPM  (div = 1)

kirkwood_thermal-virtual-0
Adapter: Virtual device
temp1:        +29.7°C
Marvell 88E1318
The SoC includes two Gigabit Ethernet MAC but no PHY. The gigabit PHY of the system is provided by a Marvell Alaska 88E1318.
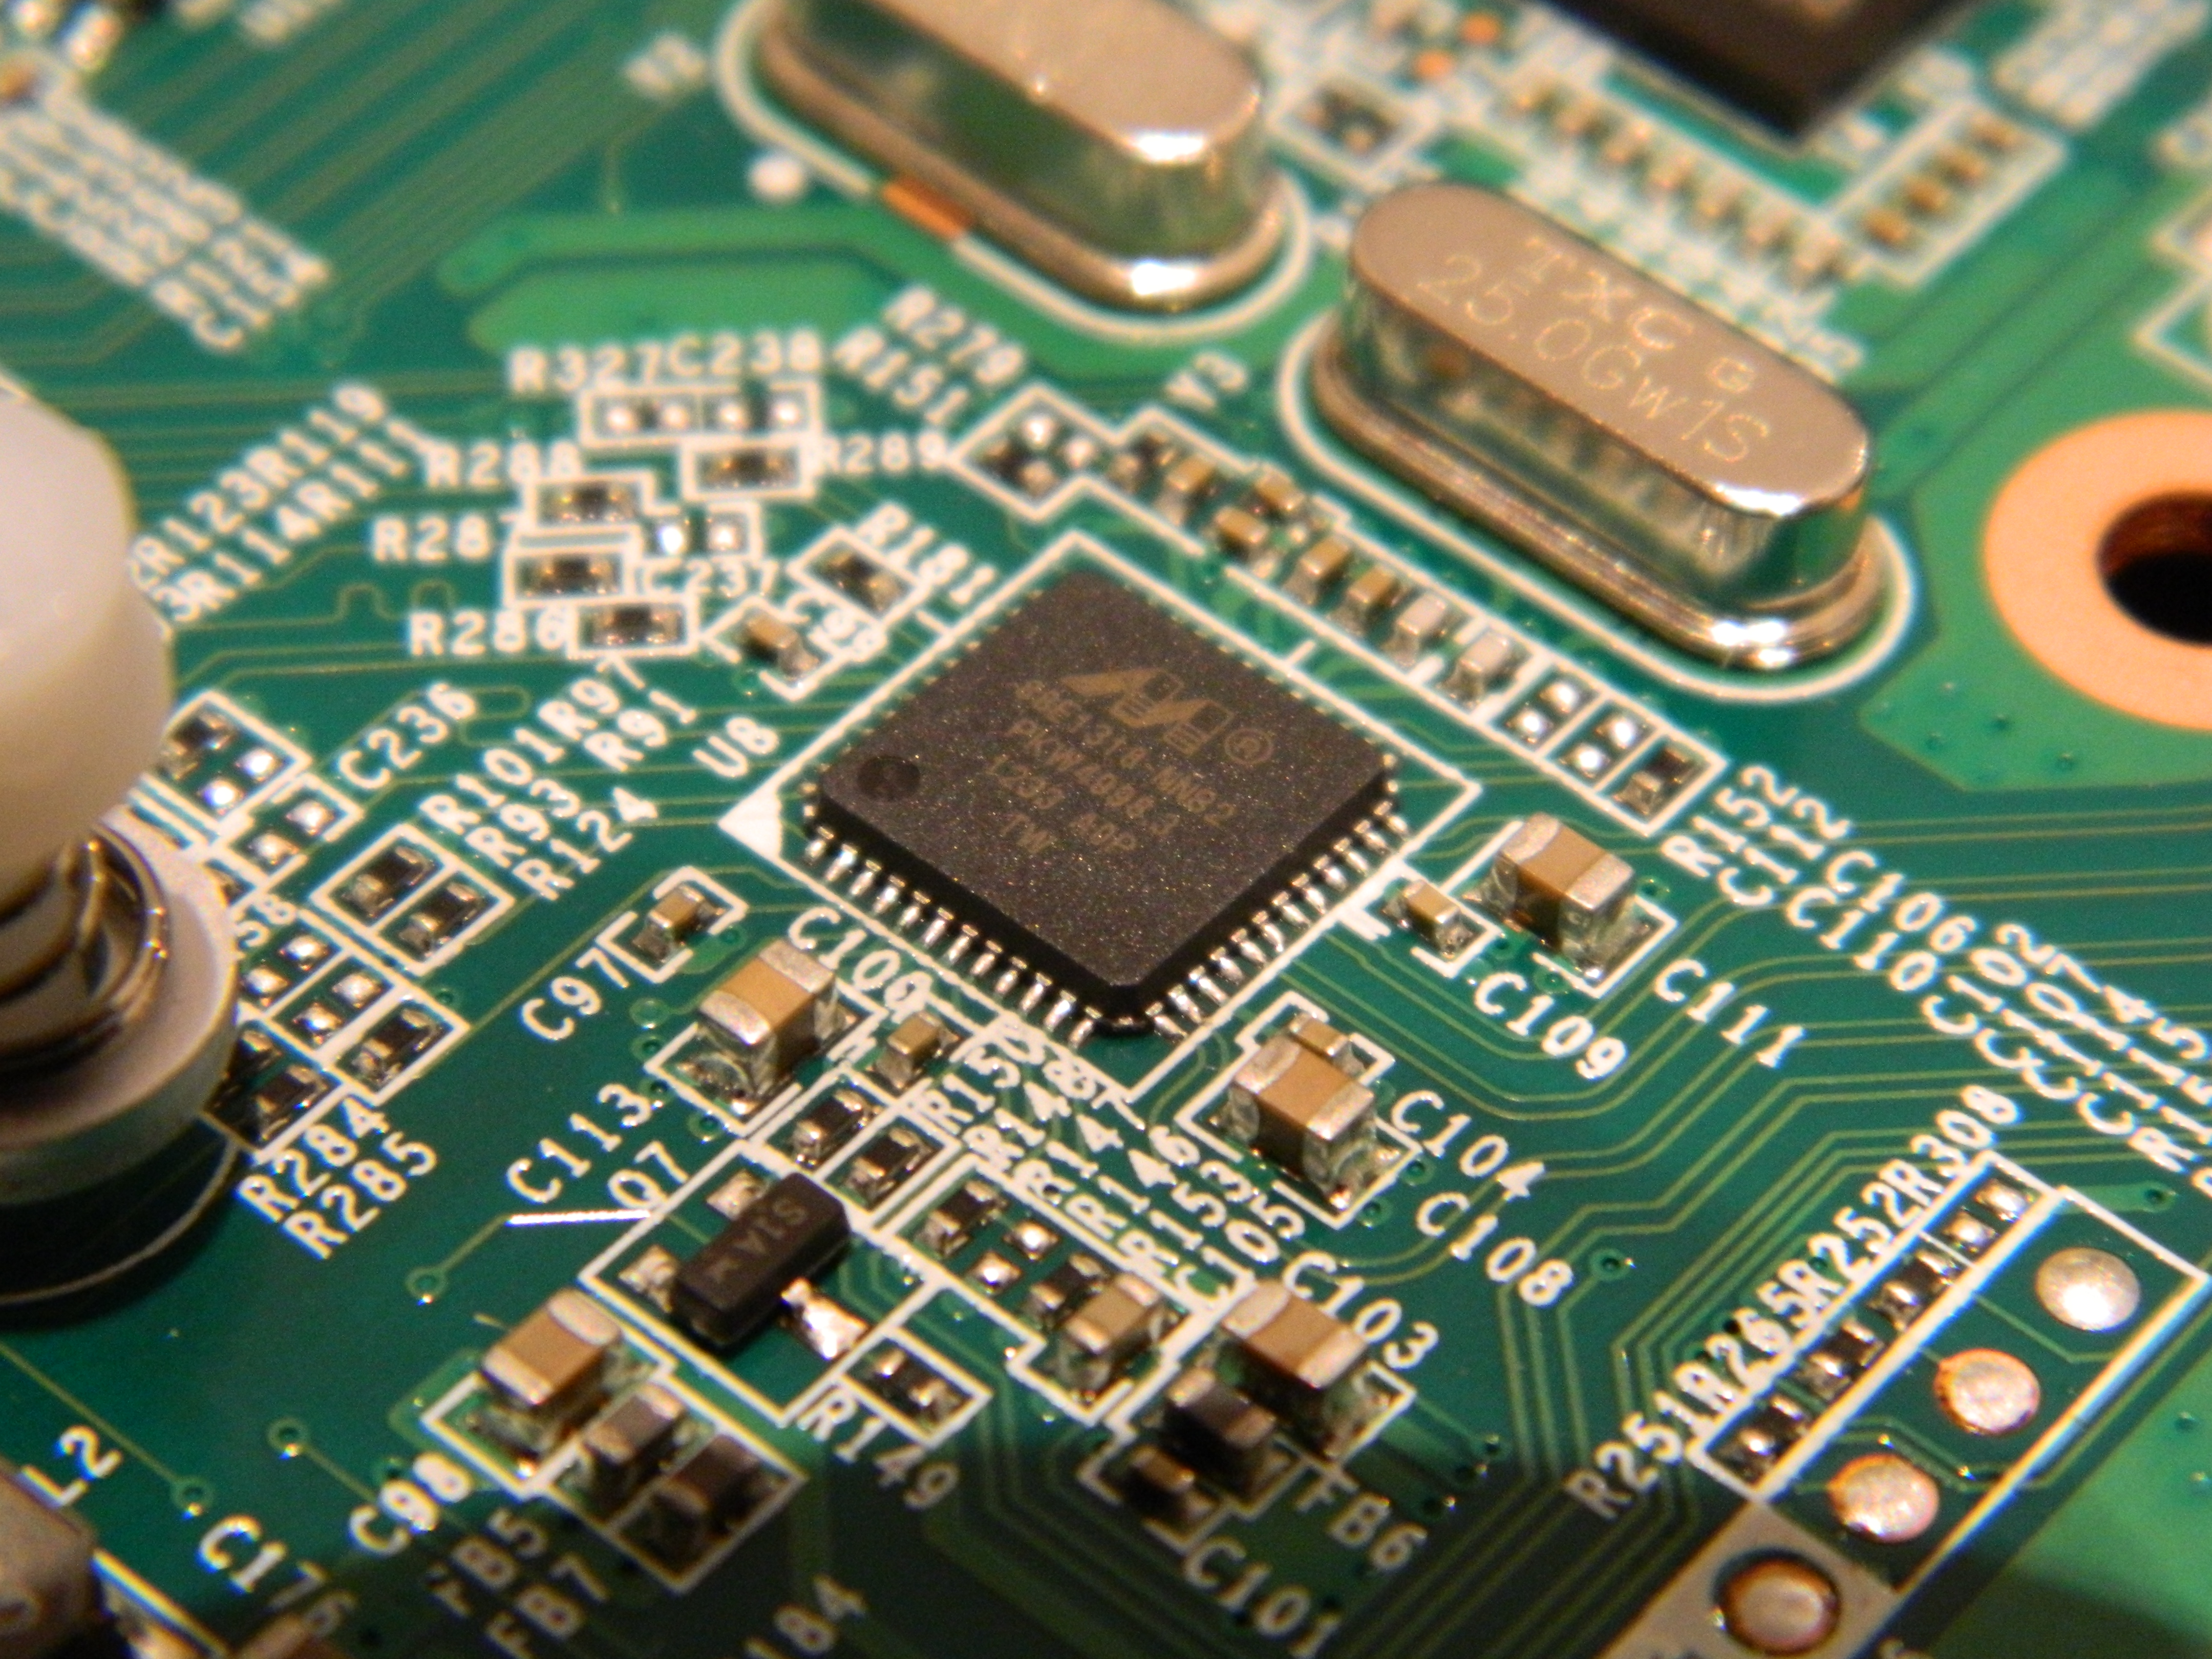
Nuvoton 3012S
Local copy of Nuvoton NCT3012S datasheet .
ATMEL AT25F512B-SSH
ATMEL AT25F512B chip is a 512 Kilobit SPI flash. The chip is used to store the configuration of the XHCI controller. It is not connected to the SoC, i.e. cannot be read or modified by the system.

CR2032 Battery
The system includes a 3V CR2032 battery to maintain the system clock when the NAS is not connected on AC power.

Serial interface / Console
Marvell SoC directly embbeds two UARTs. In the NAS, one is rooted up to the second daughter board and associated pins are directly available under a simple sticker at the rear of the device. Note that the serial port is a 3.3V one.
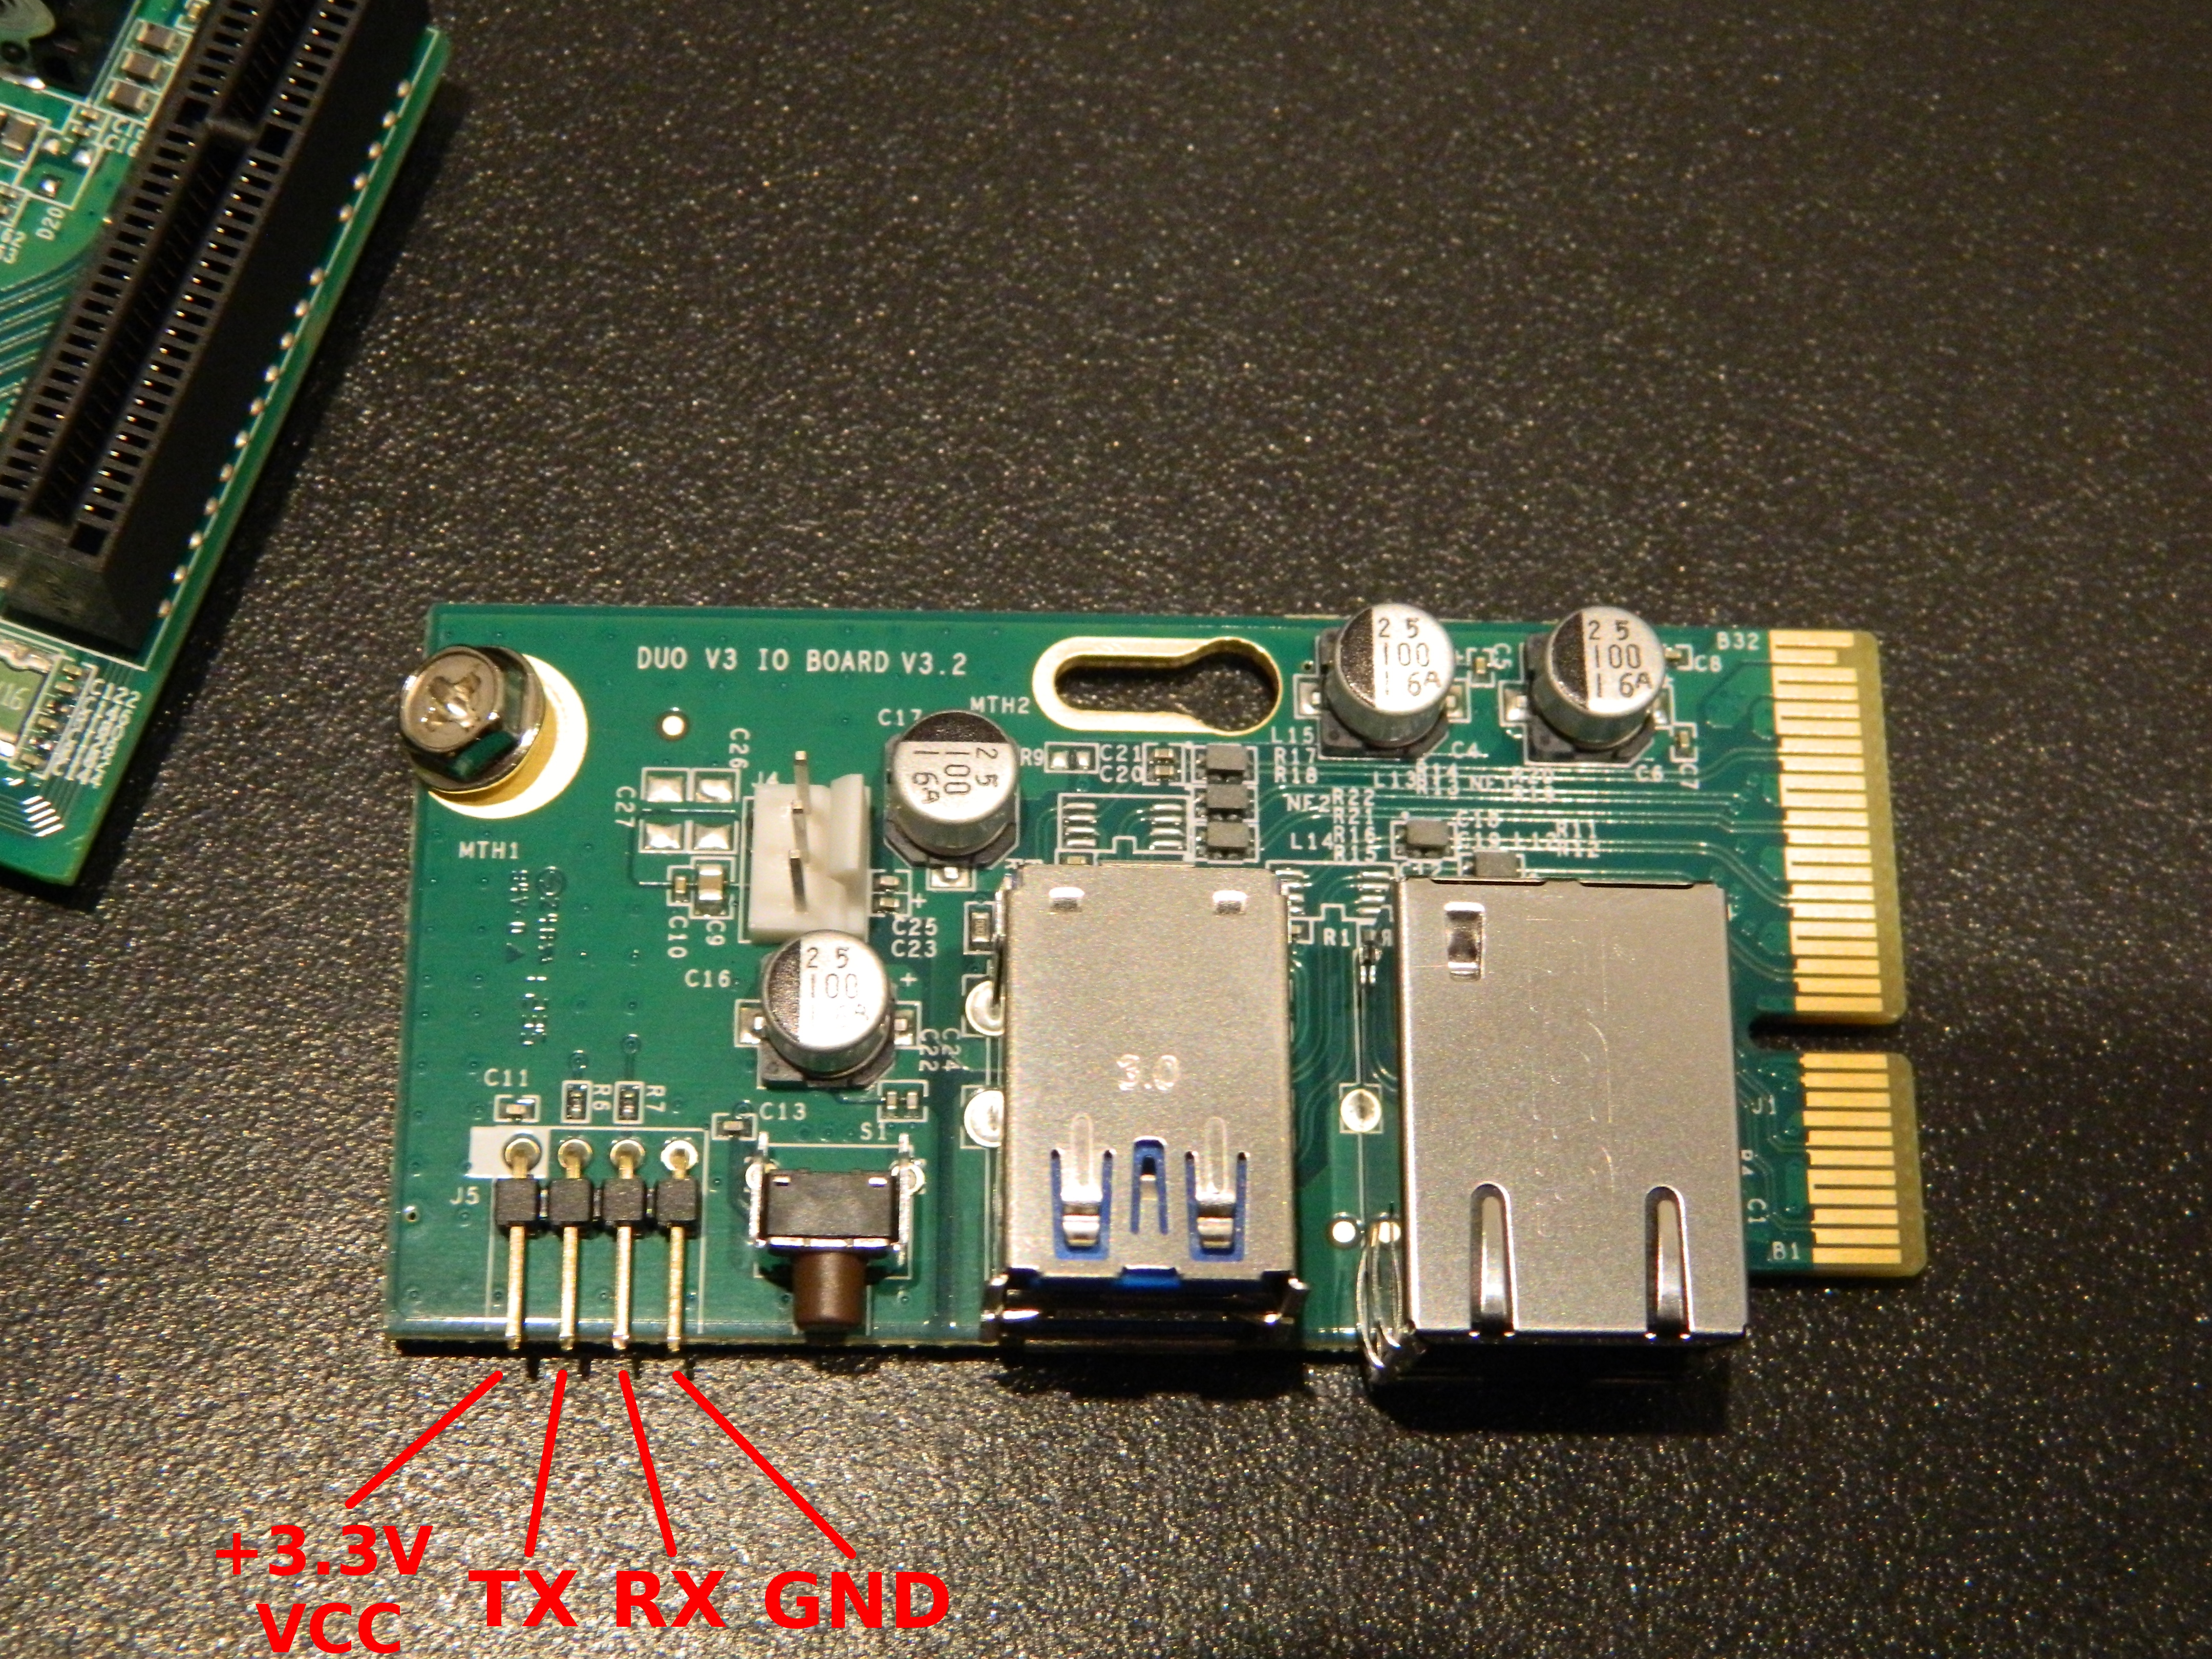
With a multimeter, it's easy to detect which pin on the board is TX, RX, GND and 3.3V VCC:
- GND: using the ohmmeter function, with the NAS unplugged, with a test probe on the enclosure, it's easy to detect which pin is the ground (GND). This is the only one for which there is continuity, i.e. the one on the right.
- VCC: with the power plug on and one test probe on the ground pin (or enclosure), the multimeter can be used as a voltmeter to detect which pin is the VCC and its voltage. This is the one on the left, with a 3.3V level.
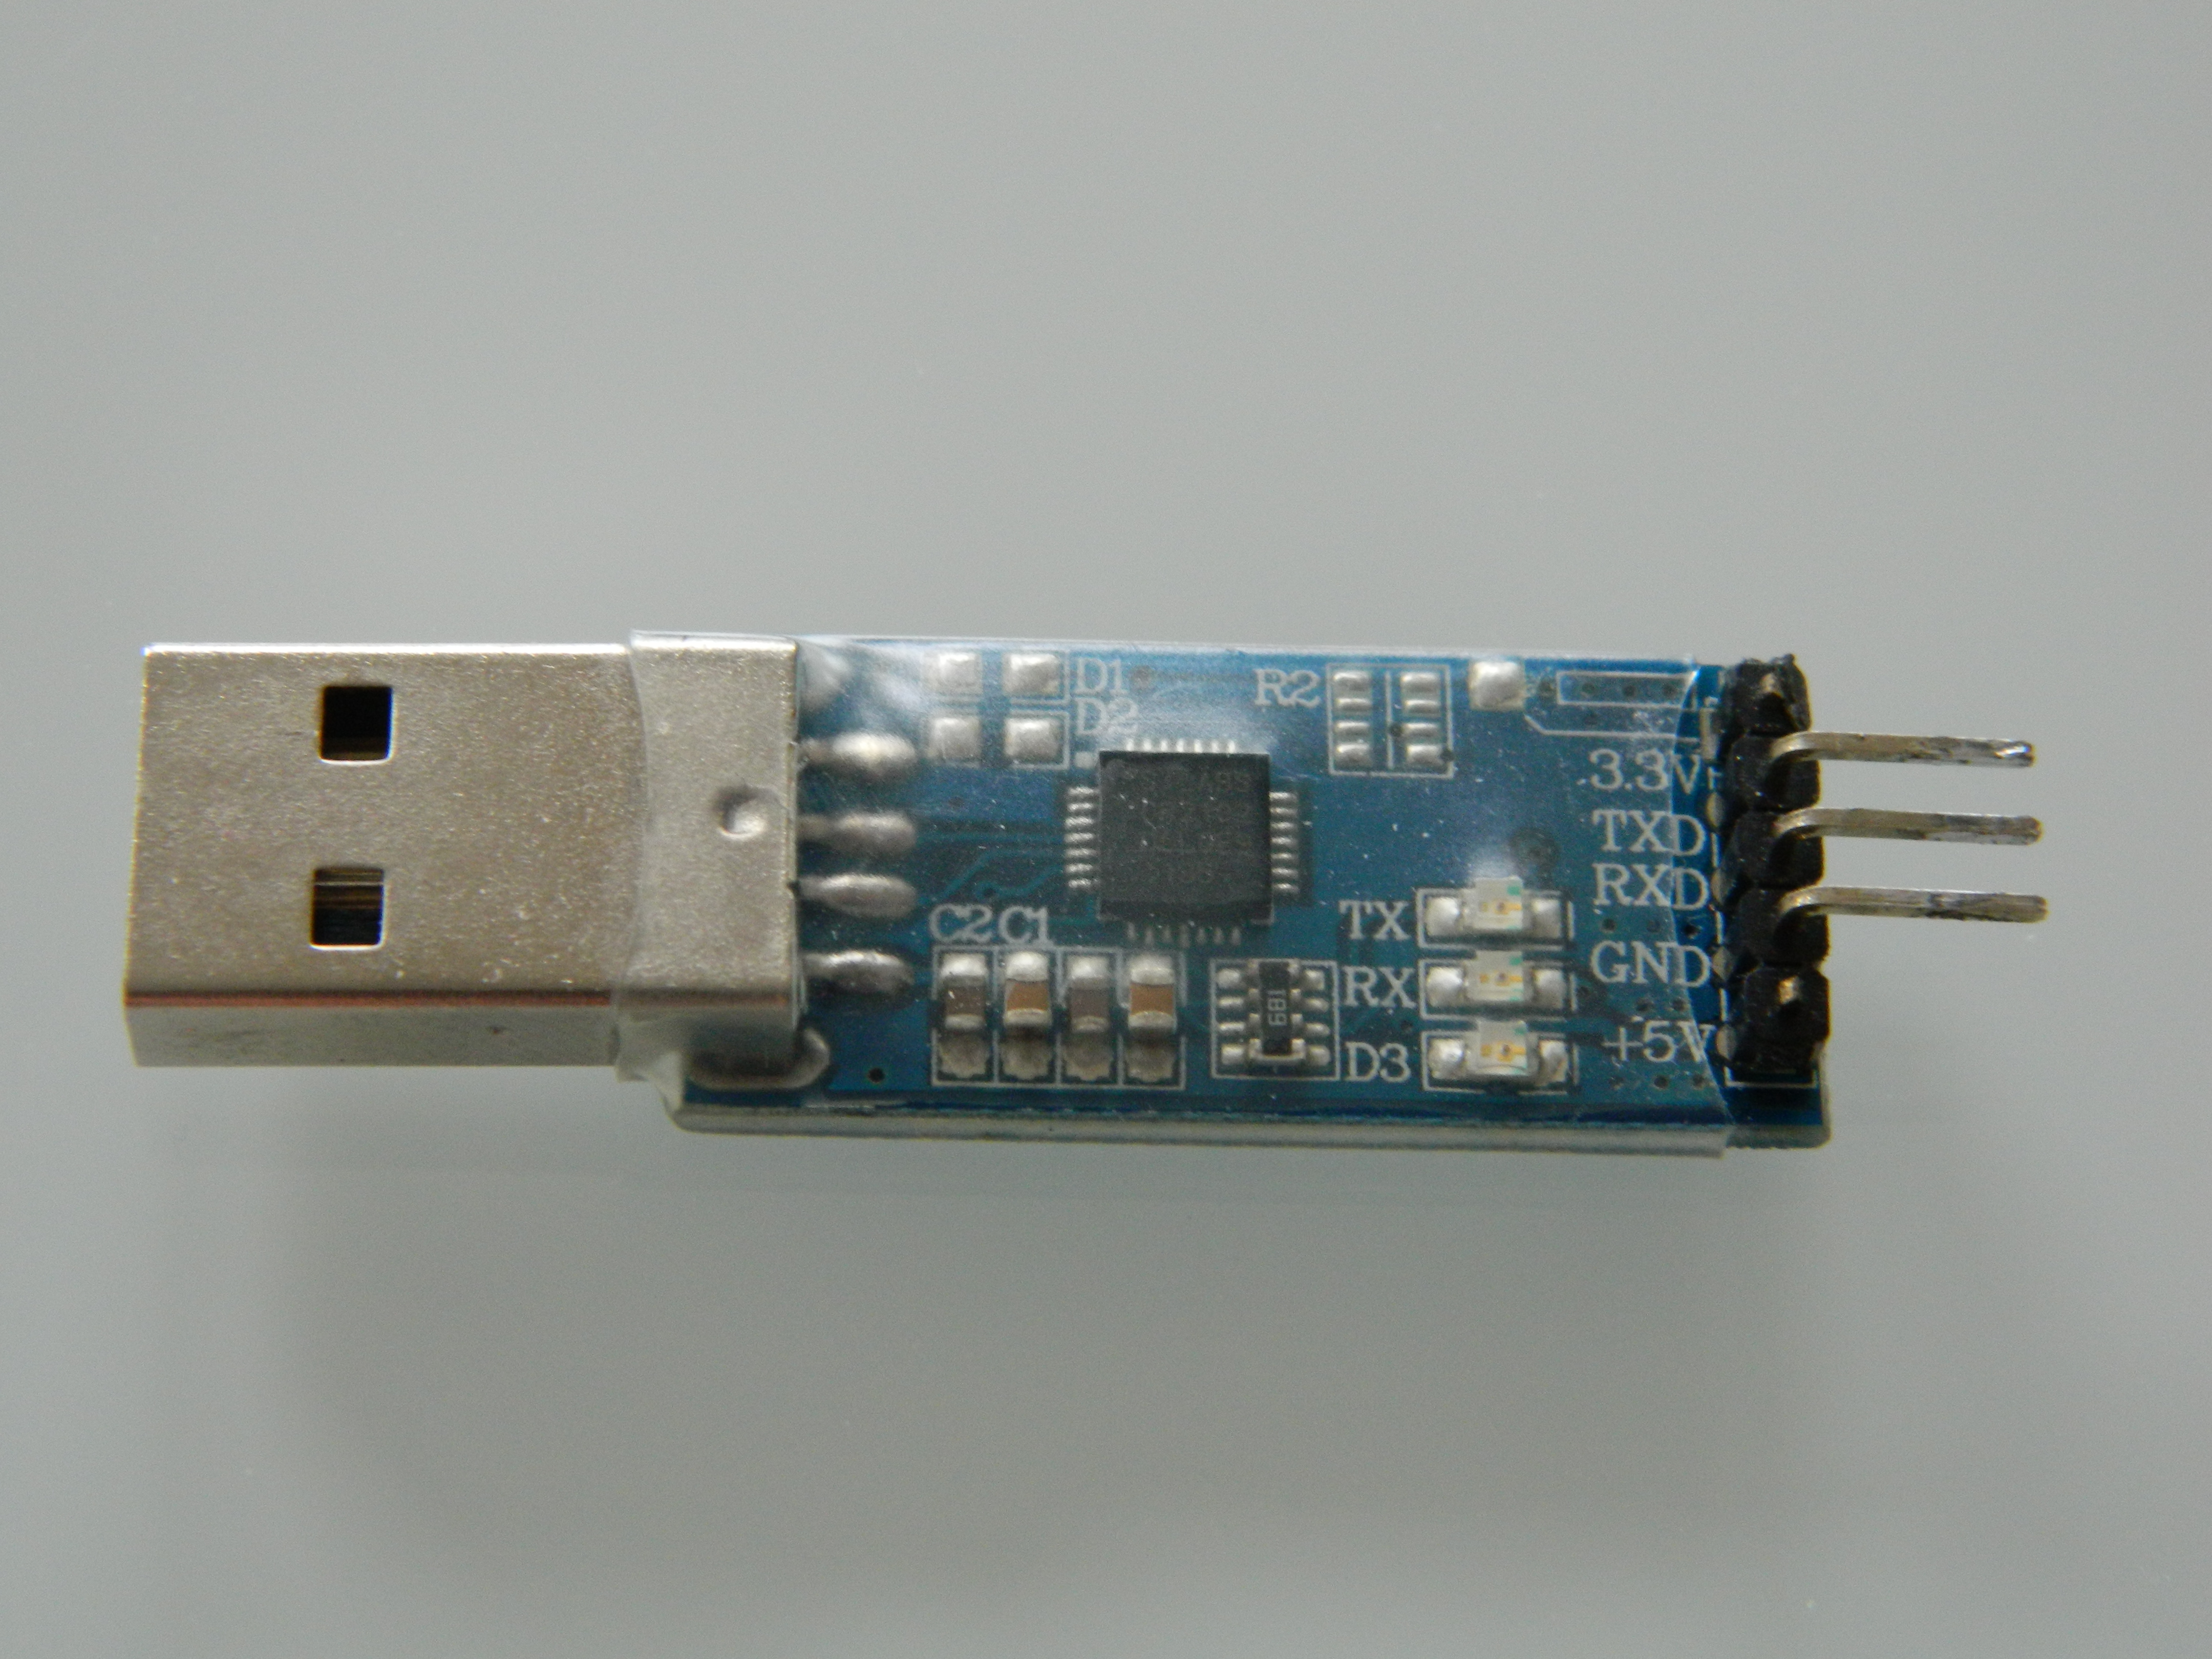
- RX and TX: using a 3.3V USB serial dongle as the one presented below, it's easy to detect which PIN is the RX and which one is the TX on the board, simply by booting the device while listening with screen on the serial interface (/dev/ttyUSB0).
Once you have a proper access to the console (i.e. TX and RX working), you can see U-boot loading and interrupt it (3 second timeslot) to get access to U-boot console:
         __  __                      _ _
        |  \/  | __ _ _ ____   _____| | |
        | |\/| |/ _` | '__\ \ / / _ \ | |
        | |  | | (_| | |   \ V /  __/ | |
        |_|  |_|\__,_|_|    \_/ \___|_|_|
 _   _     ____              _
| | | |   | __ )  ___   ___ | |_
| | | |___|  _ \ / _ \ / _ \| __|
| |_| |___| |_) | (_) | (_) | |_
 \___/    |____/ \___/ \___/ \__|
 ** MARVELL BOARD: DB-88F6282A-BP LE

U-Boot 1.1.4 (Feb  6 2012 - 14:40:46) Marvell version: 3.4.27
Netgear version: Uboot-1_1_4-NetgearDUOV3-V1008

U-Boot code: 00600000 -> 0067FFF0  BSS: -> 006D0120

Soc: MV88F1155 Rev 1 (DDR3)
CPU running @ 1600Mhz L2 running @ 533Mhz
SysClock = 533Mhz , TClock = 200Mhz

DRAM unknown CAL  tRP = 8 tRAS = 20 tRCD=8
DRAM CS[0] base 0x00000000   size 256MB
DRAM Total size 256MB  16bit width
Addresses 8M - 0M are saved for the U-Boot usage.
Mem malloc Initialization (8M - 7M): Done
NAND:128 MB
Flash:  0 kB

CPU : Marvell Feroceon (Rev 1)

Streaming disabled
Write allocate disabled


USB 0: host mode
PEX 0: PCI Express Root Complex Interface
PEX interface detected Link X1
Switch On !

Net:   egiga0 [PRIME]
Hit any key to stop autoboot:  0
Marvell>>
Some additional random notes on serial/console:
- Do not use a common 12V serial port to connect to the serial line to avoid destroying it.
- You do not need to connect VCC pin.
- Even tough I could see the output of the boot process via the serial console, I had no luck writing to the serial line (or interrupting the boot) w/ minicom and quickly switched to screen (screen /dev/ttyUSB0 115200).
- RX and TX pins from the board need to be connected to TXD and RXD pins on the dongle respectively.
Fairchild FDS 4435BZ
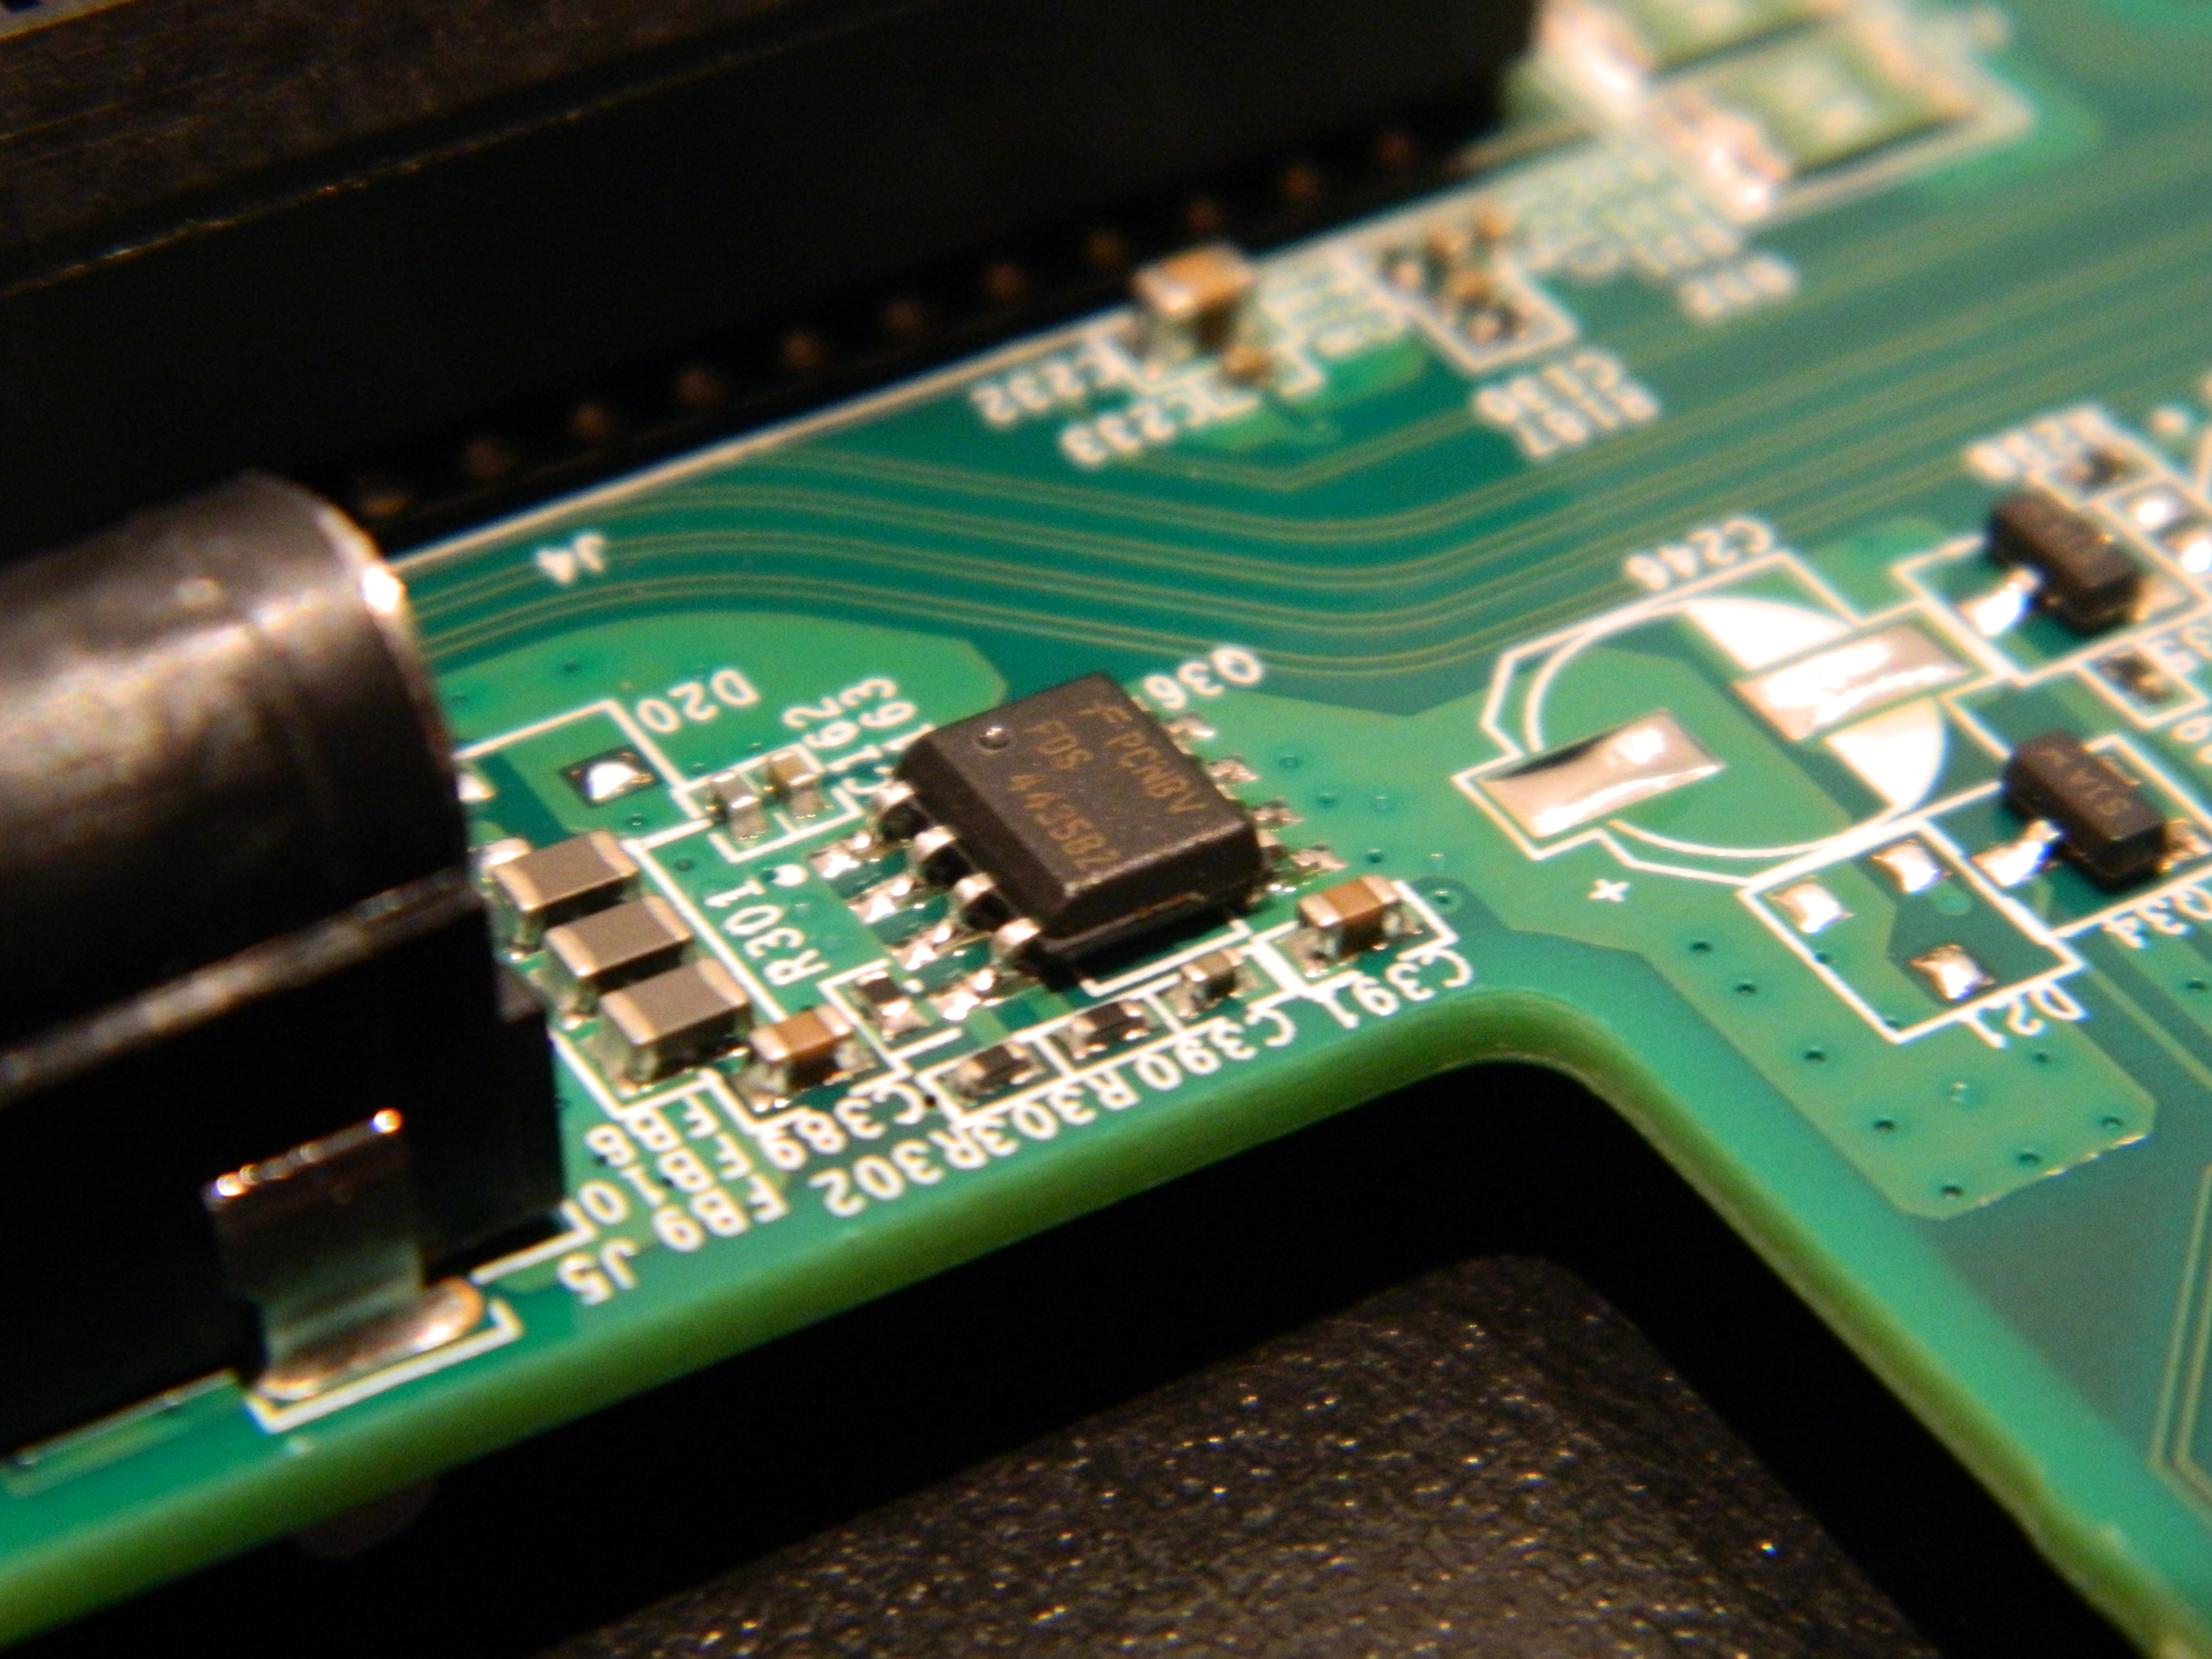
Local copy of Fairchild FDS 4435BZ datasheet. Local copy of Fairchild FDS 4435BZ datasheet.
Fairchild FDS 8984
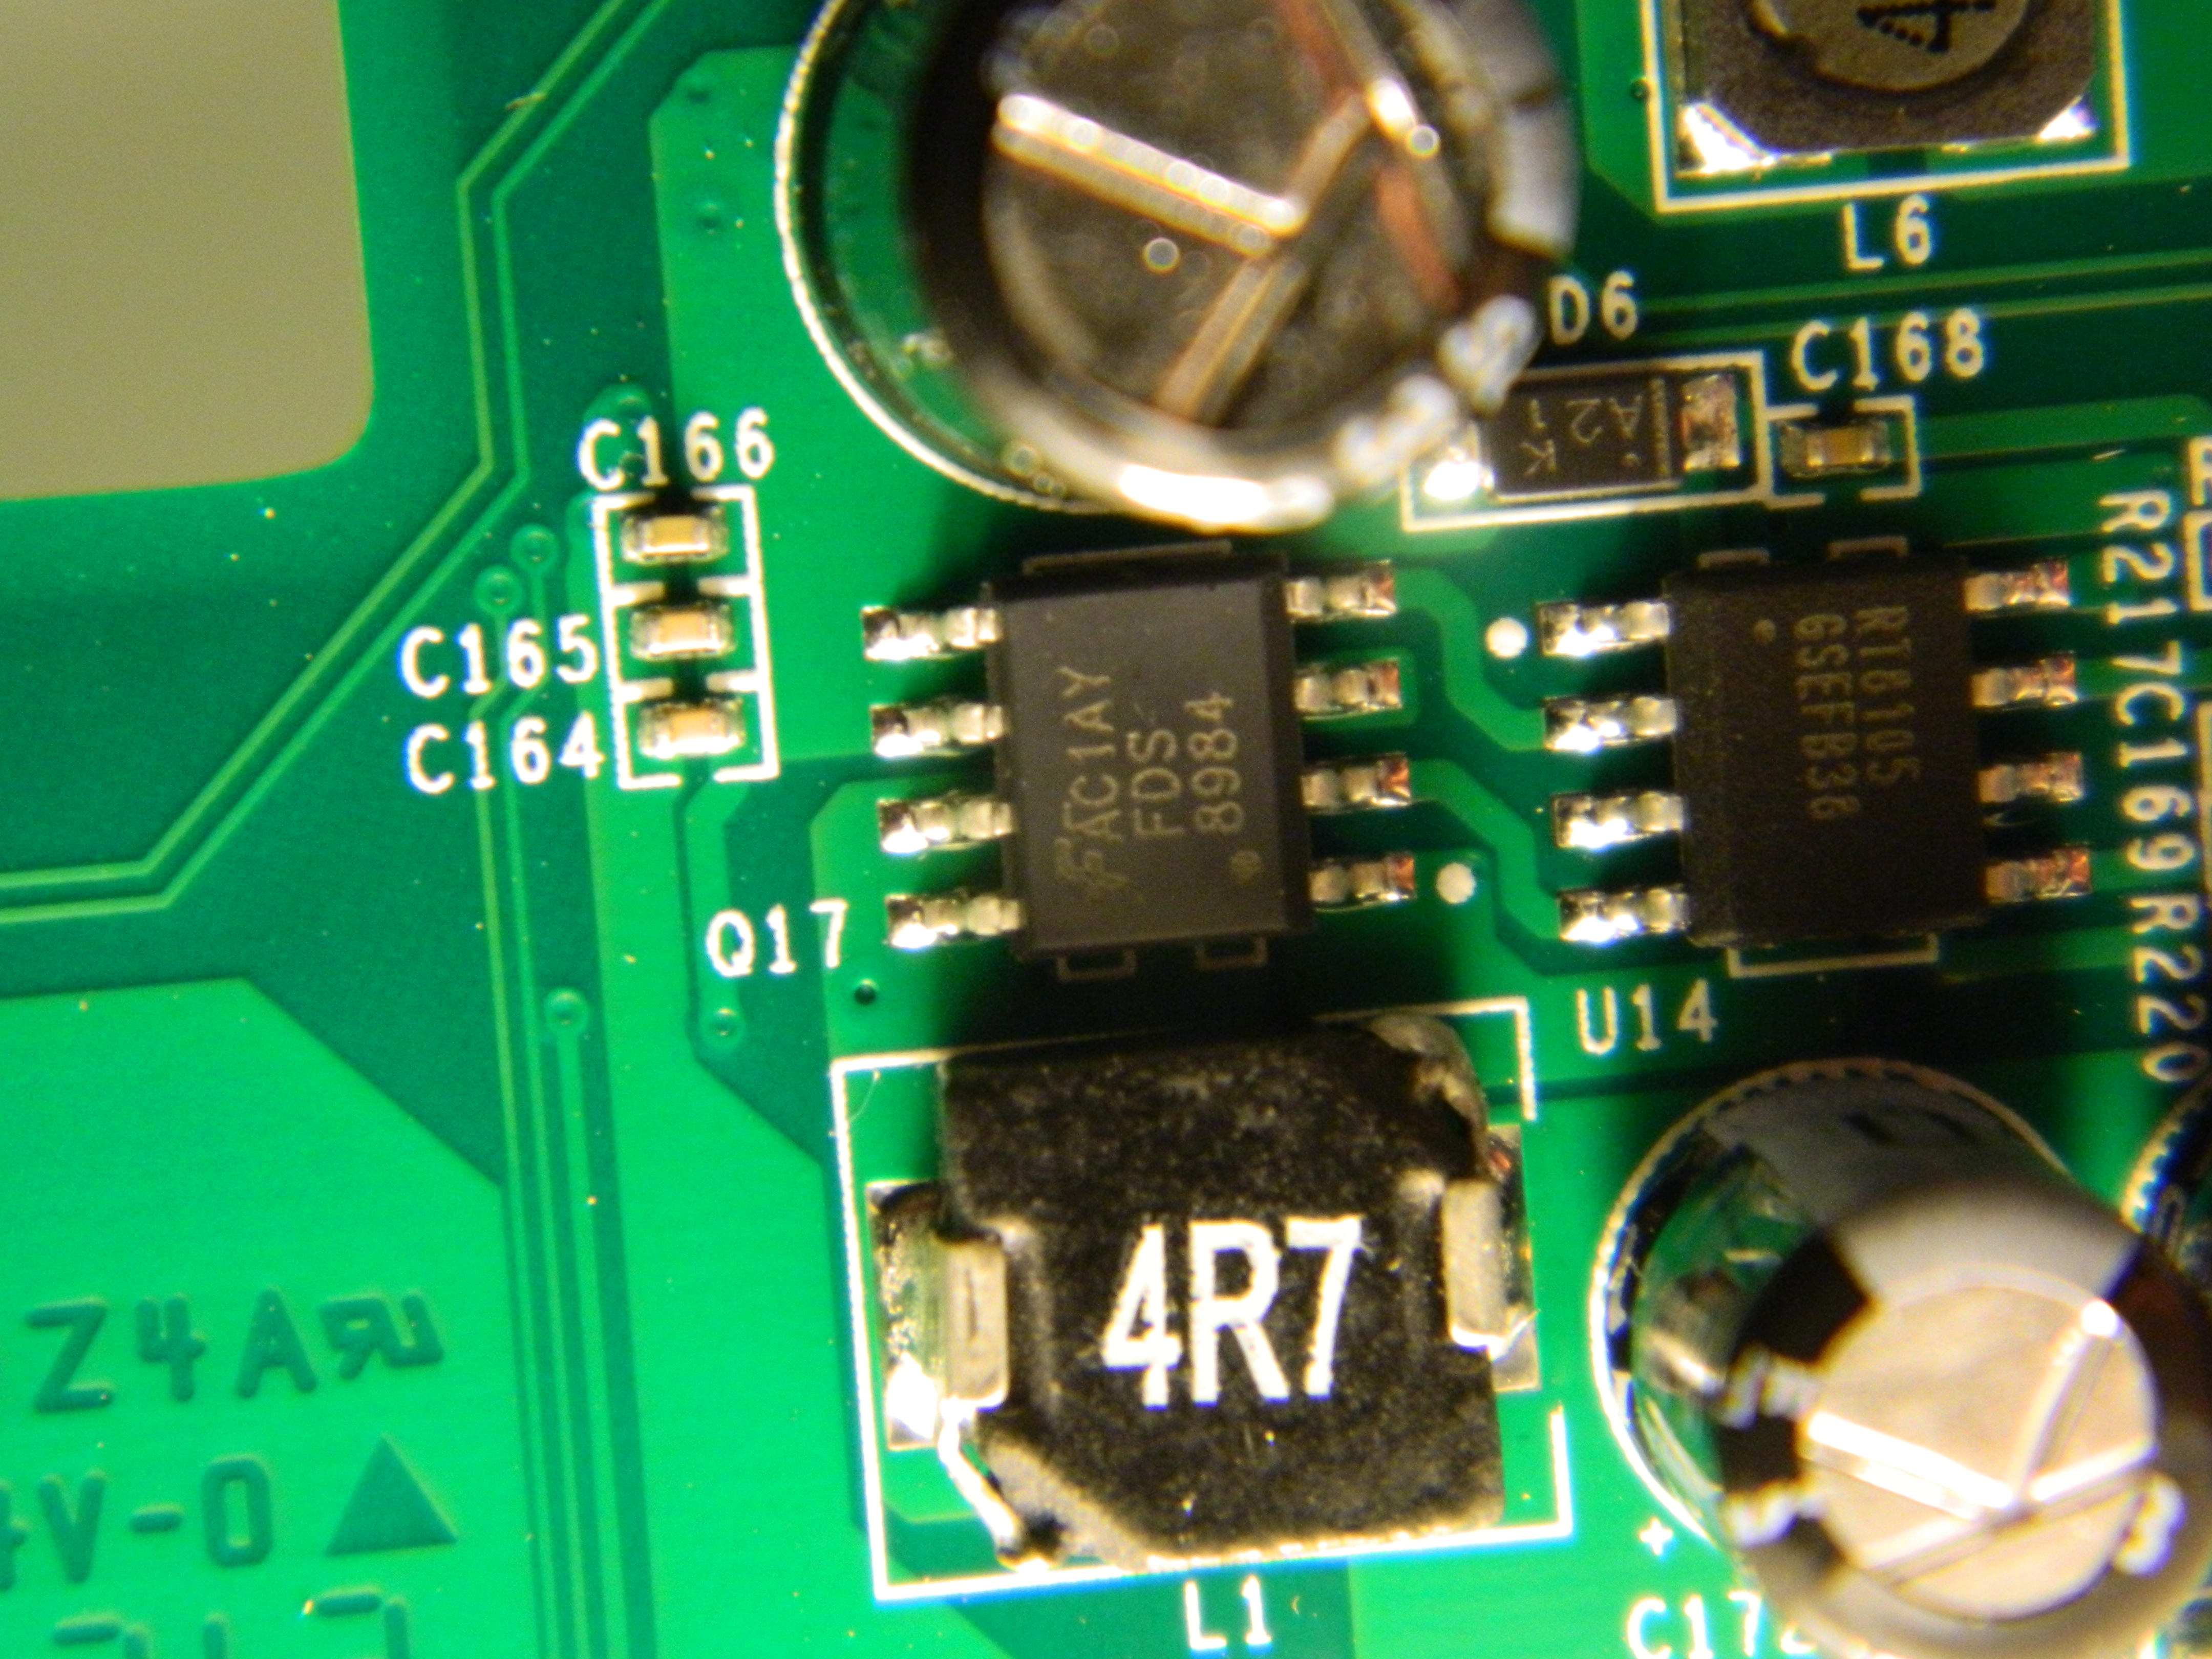
Local copy of Fairchild FDS 8984 datasheet.
JTAG access ???
Marvell G47B
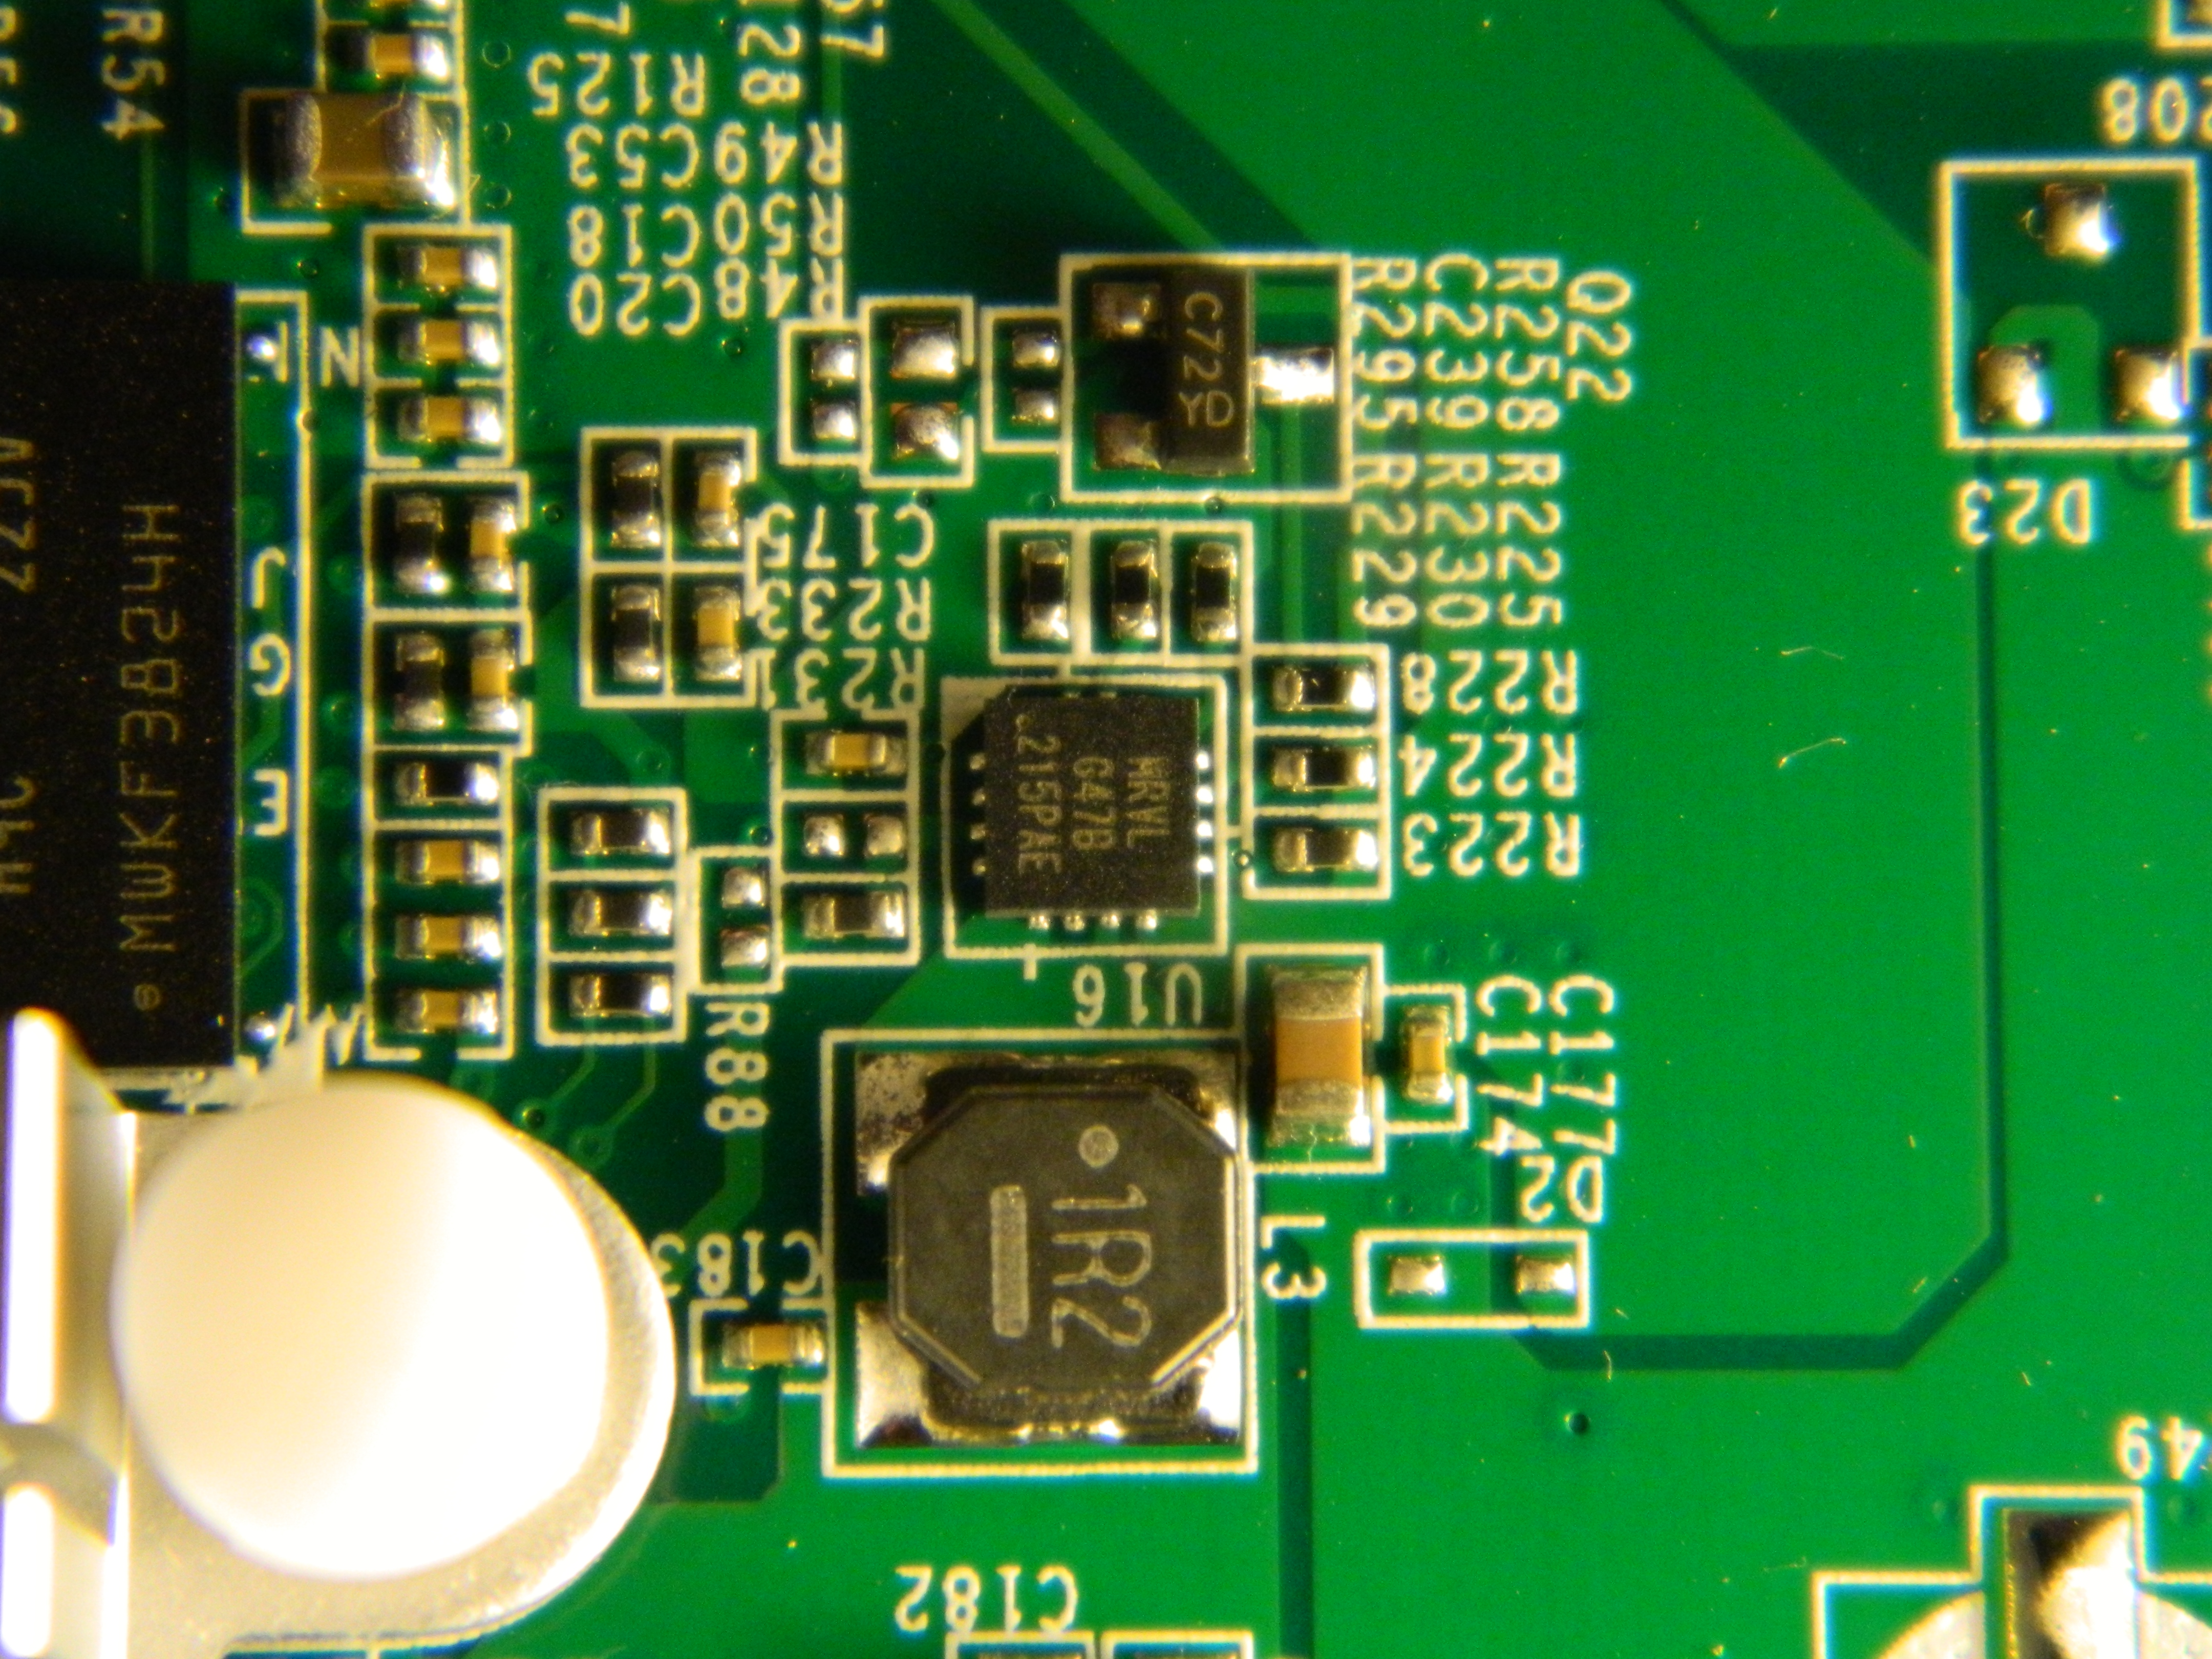
Richtek RT8105

Local copy of Richtek RT8105 datasheet.
Texas Instruments - TPS65251
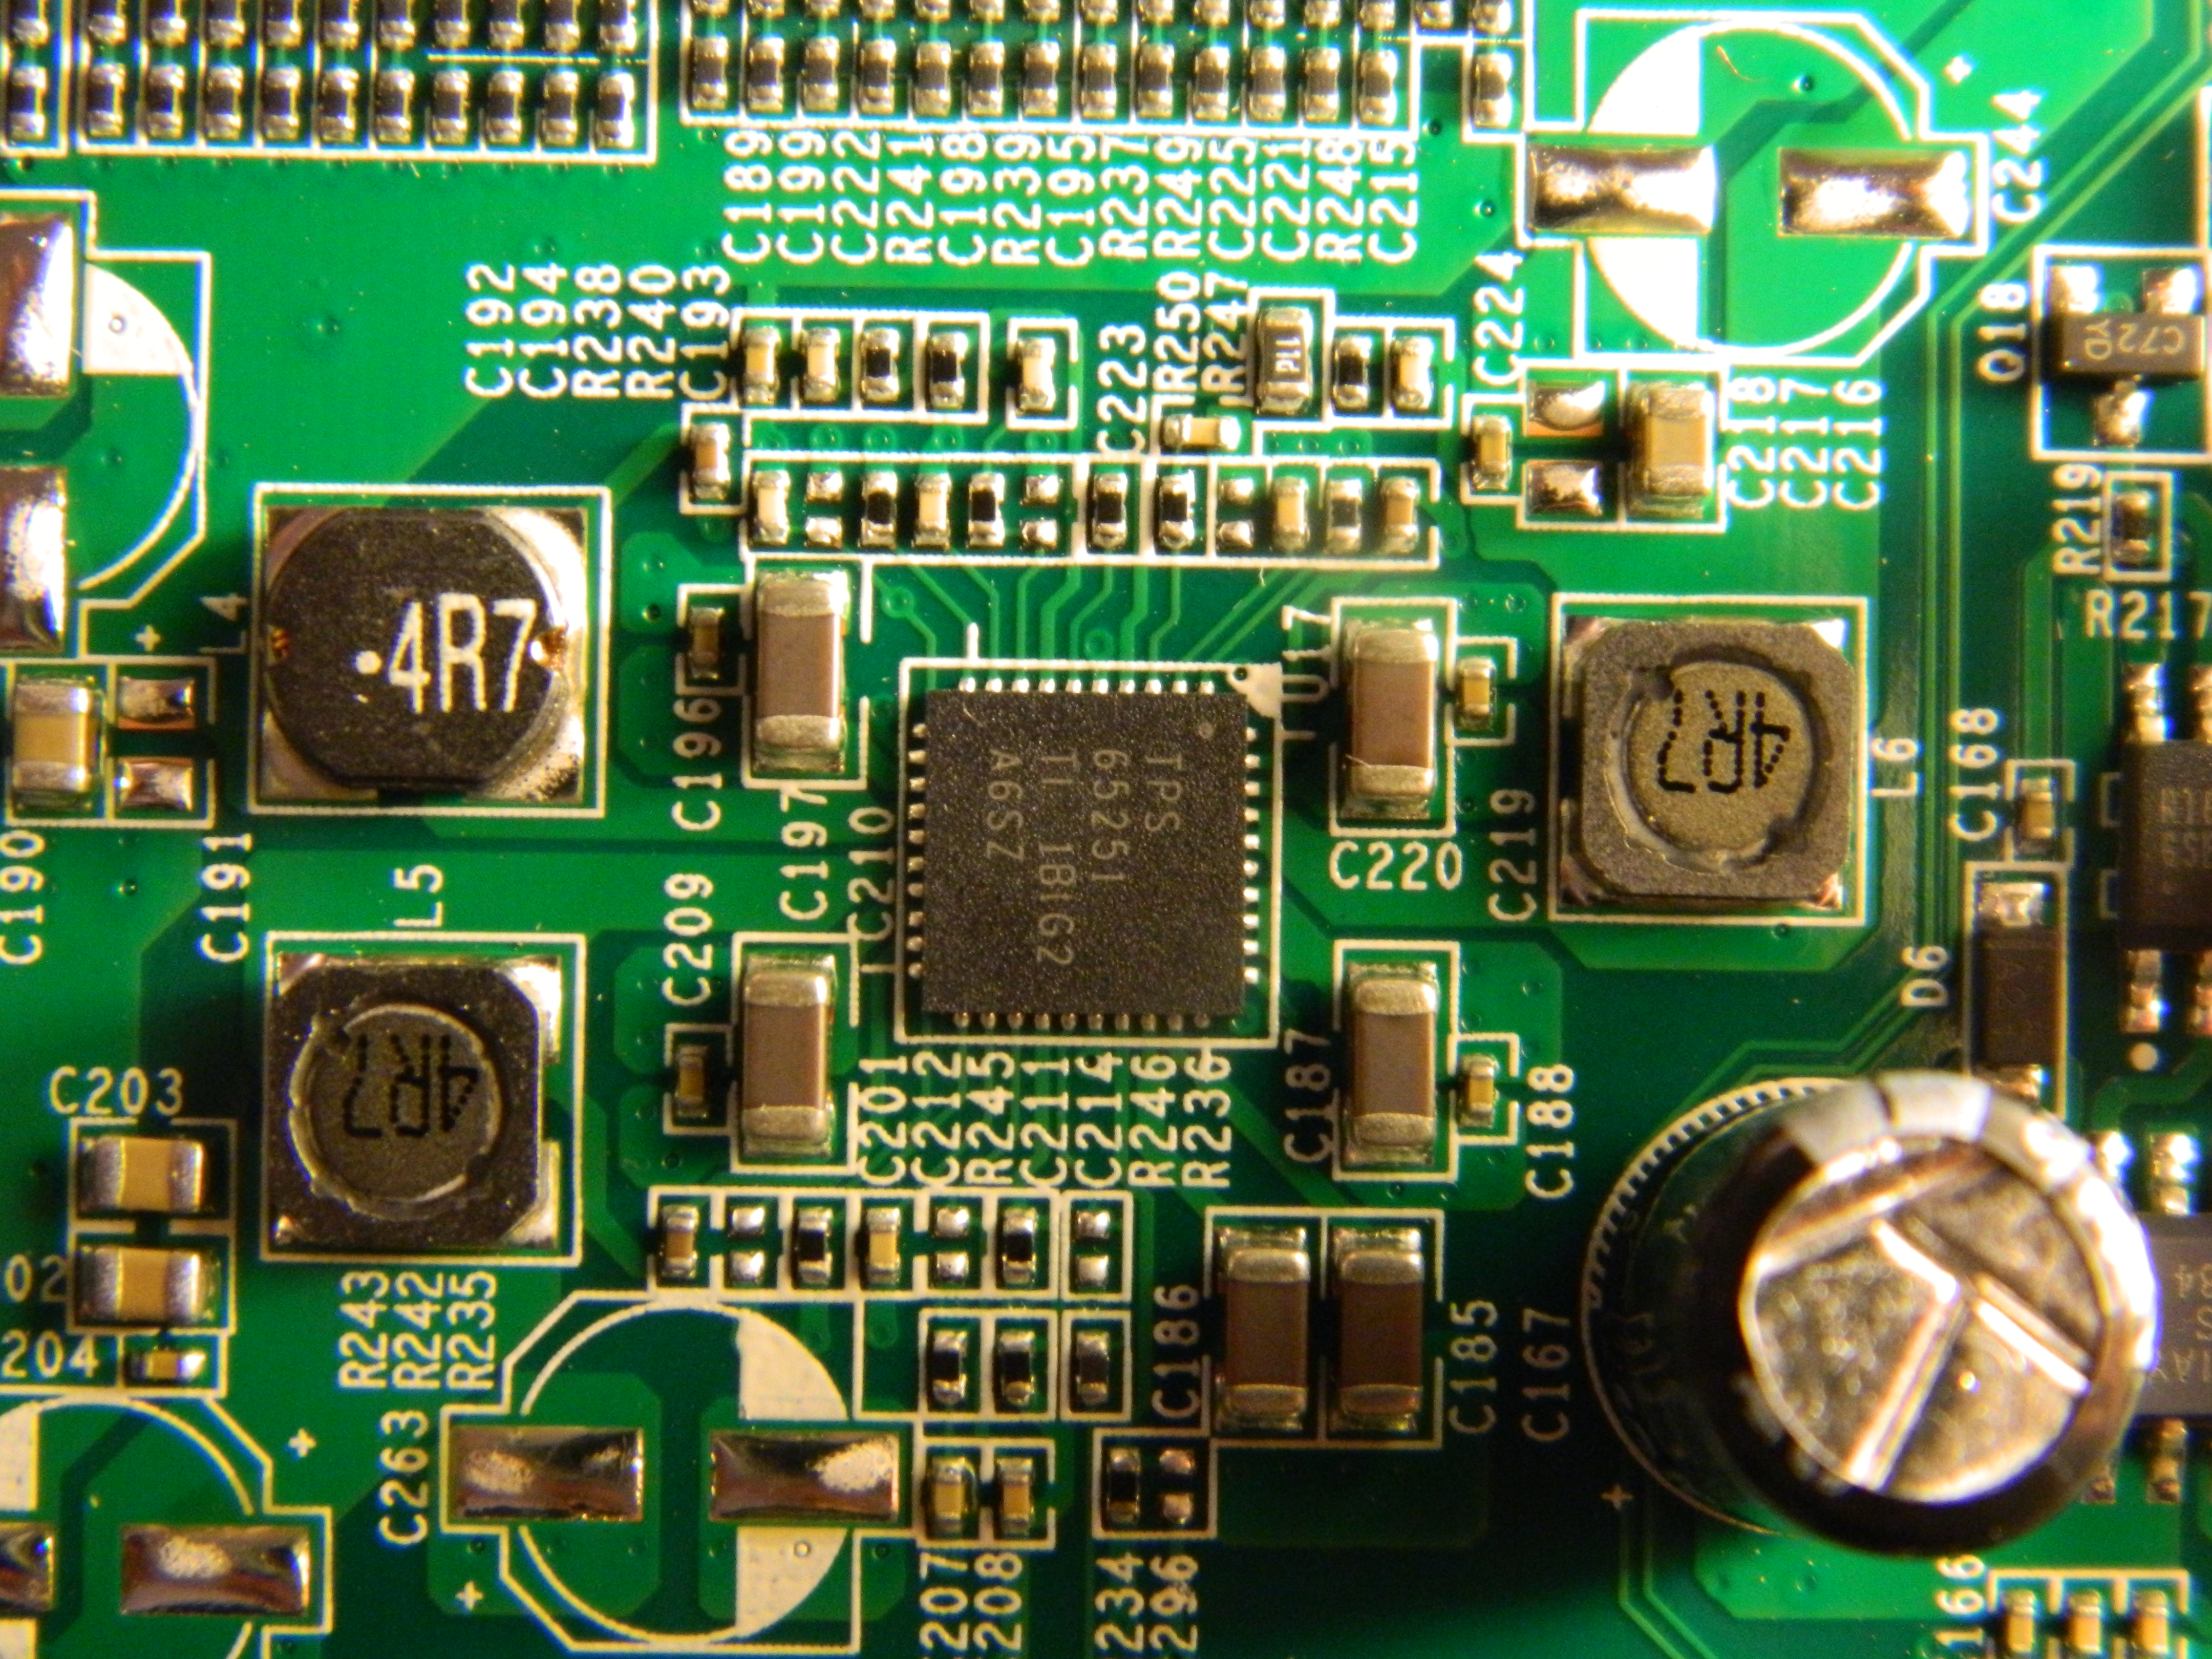
Local copy of TPS 65251 datasheet.
LEDs and Buttons
Marvell Cryptograpic Engine and Security Accelerator (CESA)
Linux Kernel supports Marvell Cryptographic Engine and Security Accelerator (drivers/crypto/mv_cesa.{c,h}, commit 85a7f0ac). DT support has been recently added (see kirkwood.dtsi).
The hardware engine supports:
- AES encryption algorithm (ECB and CBC modes with key lengths of 128, 192 and 256 bits)
- SHA1 hash algorithm
- HMAC-SHA1 mac algorithm
Nonetheless, at time of writing, current kernel code does not support DMA, and even thoug some initial discussions have taken place.
DMA/XOR engine
Marvell SoC such as Orion and Kirkwood support DMA XOR (and memcpy(), memset()) operations. Those can be useful to decrease CPU utilization in RAID setup. Here is the commit message associated with the introduction of the feature in Linux Kernel.
commit ff7b04796d9866327ea76e1393f1e902ef032f84
Author: Saeed Bishara <saeed@marvell.com>
Date:   Tue Jul 8 11:58:36 2008 -0700

    dmaengine: DMA engine driver for Marvell XOR engine

    The XOR engine found in Marvell's SoCs and system controllers
    provides XOR and DMA operation, iSCSI CRC32C calculation, memory
    initialization, and memory ECC error cleanup operation support.

    This driver implements the DMA engine API and supports the following
    capabilities:
    - memcpy
    - xor
    - memset

    The XOR engine can be used by DMA engine clients implemented in the
    kernel, one of those clients is the RAID module.  In that case, I
    observed 20% improvement in the raid5 write throughput, and 40%
    decrease in the CPU utilization when doing array construction, those
    results obtained on an 5182 running at 500Mhz.

    When enabling the NET DMA client, the performance decreased, so
    meanwhile it is recommended to keep this client off.

    Signed-off-by: Saeed Bishara <saeed@marvell.com>
    Signed-off-by: Lennert Buytenhek <buytenh@marvell.com>
    Signed-off-by: Nicolas Pitre <nico@marvell.com>
    Acked-by: Maciej Sosnowski <maciej.sosnowski@intel.com>
    Signed-off-by: Dan Williams <dan.j.williams@intel.com>
Note that the feature is also available for DT-converted SoC, as kikwood.dtsi file now has the required definition (since commit c896ed0f)
Step by step kernel build
This section documents in details a step by step build and install of a 3.11 kernel on the ReadyNAS Duo v2. The steps should be similar for a more recent kernel version.
Cross-compilation toolchain
The first thing needed to compile the kernel is a cross-compilation toolchain. Assuming you are on Debian, you can just emdebian.org repositories to get the required packages:
root@small# cat > /etc/apt/sources.list.d/emdebian.sources.list
deb http://www.emdebian.org/debian unstable main
^D
root@small# apt-get update
root@small# apt-get install binutils-arm-linux-gnueabi \
                            gcc-4.7-arm-linux-gnueabi \
                            libgcc1-armel-cross \
                            linux-libc-dev-armel-cross
Kernel Build
Now that we have a compiler to create arm binaries, let's first grab our kernel.
arno@small$ wget http://www.kernel.org/pub/linux/kernel/v3.x/linux-3.11.tar.gz
arno@small$ wget http://www.kernel.org/pub/linux/kernel/v3.x/linux-3.11.tar.sign
arno@small$ gunzip linux-3.11.tar.gz
arno@small$ gpg --verify linux-3.11.tar.sign
gpg: Signature made Mon 02 Sep 2013 10:50:04 PM CEST using RSA key ID 00411886
gpg: Good signature from "Linus Torvalds <torvalds@linux-foundation.org>"
arno@small$ tar xf linux-3.11.tar
Let's now configure it
arno@small$ cd linux-3.11
arno@small$ wget http://natisbad.org/NAS/config-duov2-3.11
arno@small$ mv config-duov2-3.11 .config
arno@small$ export ARCH=arm
arno@small$ export CROSS_COMPILE=arm-linux-gnueabi-
arno@small$ make oldconfig
scripts/kconfig/conf --oldconfig Kconfig
#
# configuration written to .config
#
arno@small$ make menuconfig
Let's now build the kernel zImage, append it to our Netgear ReadyNAS Duo v2 .dtb (Device Tree Blob) generated from .dts (Device Tree Source) file and then make a uImage out of it. The resulting uImage is then copied to our tftp folder to be served to the NAS.
arno@small$ make -j 16
arno@small$ cat arch/arm/boot/dts/kirkwood-netgear_readynas_duo_v2.dtb >> arch/arm/boot/zImage
arno@small$ make uImage
arno@small$ sudo cp arch/arm/boot/uImage /srv/tftp/
Serial access to u-boot and system console
Details of serial console access is described in hardware section.
tftp setup to serve kernel image (and later Debian installer).
The best way to push required binaries (kernel images, debian installer) to the NAS is probably via tftp. This is done quite simply from your Debian host by installing openbsd-inetd and atftpd packages (I got issues with tftpd packages so I would suggest not to use it). If you have a firewall running on your host, you need to temporarily allow incoming connection on 69/udp.
arno@small$ sudo apt-get install openbsd-inetd atftpd
arno@small$ sudo /etc/init.d/openbsd-inetd restart
arno@small$ sudo iptables -A INPUT -i eth0 -p udp --dport 69 -j ACCEPT
Then, we get access to the console and then plug the power cord without powering the device. The following appears:
arno@small$ screen /dev/ttyUSB0 115200

         __  __                      _ _
        |  \/  | __ _ _ ____   _____| | |
        | |\/| |/ _` | '__\ \ / / _ \ | |
        | |  | | (_| | |   \ V /  __/ | |
        |_|  |_|\__,_|_|    \_/ \___|_|_|
 _   _     ____              _
| | | |   | __ )  ___   ___ | |_
| | | |___|  _ \ / _ \ / _ \| __|
| |_| |___| |_) | (_) | (_) | |_
 \___/    |____/ \___/ \___/ \__|
 ** MARVELL BOARD: DB-88F6282A-BP LE

U-Boot 1.1.4 (Feb  6 2012 - 14:40:46) Marvell version: 3.4.27
Netgear version: Uboot-1_1_4-NetgearDUOV3-V1008

U-Boot code: 00600000 -> 0067FFF0  BSS: -> 006D0120

Soc: MV88F1155 Rev 1 (DDR3)
CPU running @ 1600Mhz L2 running @ 533Mhz
SysClock = 533Mhz , TClock = 200Mhz

DRAM unknown CAL  tRP = 8 tRAS = 20 tRCD=8
DRAM CS[0] base 0x00000000   size 256MB
DRAM Total size 256MB  16bit width
Addresses 8M - 0M are saved for the U-Boot usage.
Mem malloc Initialization (8M - 7M): Done
NAND:128 MB
Flash:  0 kB

CPU : Marvell Feroceon (Rev 1)

Streaming disabled
Write allocate disabled


USB 0: host mode
PEX 0: PCI Express Root Complex Interface
PEX interface detected Link X1
Plug On and Power down, Please Switch On !
We can then power on the device. This will present a 3 seconds countdown which allow us to interrupt the boot process and access u-boot, simply by hitting a key. Let's do just that.
Net:   egiga0 [PRIME]
Hit any key to stop autoboot:  0

Marvell>>
For the record, let's just print current u-boot environment
Marvell>> printenv
baudrate=115200
loads_echo=0
ipaddr=192.168.58.21
serverip=192.168.58.135
rootpath=/mnt/ARM_FS/
netmask=255.255.255.0
run_diag=no
console=console=ttyS0,115200
CASset=min
ethprime=egiga0
bootargs_root=root=/dev/nfs rw
bootargs_end=:::DB88FXX81:eth0:none
image_name=uImage
standalone=fsload 0x2000000 $(image_name);setenv bootargs $(console) root=/dev/mtdblock0 rw \
           ip=$(ipaddr):$(serverip)$(bootargs_end) $(mvPhoneConfig); bootm 0x2000000;
ethmtu=1500
mvPhoneConfig=mv_phone_config=dev0:fxs,dev1:fxs
mvNetConfig=mv_net_config=(00:11:88:0f:62:81,0:1:2:3),mtu=1500
usb0Mode=host
yuk_ethaddr=00:00:00:EE:51:81
nandEcc=1bit
netretry=no
rcvrip=169.254.100.100
loadaddr=0x02000000
autoload=no
ethaddr=2c:b0:5d:be:c8:d6
bootcmd=nand read.e 0x1200000 0x200000 0x600000;nand read.e 0x2000000 0x800000 0x1000000; \
        bootm 0x1200000 0x2000000
ethact=egiga0
arcNumber=4919
stdin=serial
stdout=serial
stderr=serial
mainlineLinux=yes
enaMonExt=no
enaCpuStream=no
enaWrAllo=no
pexMode=RC
disL2Cache=no
setL2CacheWT=yes
disL2Prefetch=yes
enaICPref=yes
enaDCPref=yes
sata_dma_mode=yes
netbsd_en=no
vxworks_en=no
bootdelay=3
disaMvPnp=no
enaAutoRecovery=yes
pcieTune=no
bootargs=console=ttyS0,115200 reason=normal mtdparts= <SNIP>...
Environment size: 1794/131068 bytes
As you can see, the environment contains the expected address of the tftp server (serverip parameter) and the NAS IP address (ipaddr):
...

Net:   egiga0 [PRIME]
Hit any key to stop autoboot:  0
Marvell>> printenv
...
ipaddr=192.168.58.21
serverip=192.168.58.135
...
As you can see above, u-boot environment expects the tftp server to be available at IP address 192.168.58.135. Let's just configure that adress on our host:
arno@small# sudo ip addr add 192.168.58.135/24 dev eth0
Booting your first kernel
Let's now load kernel image we built (uImage) in memory at address 0x1200000
Marvell>> tftpboot 1200000 uImage
Using egiga0 device
TFTP from server 192.168.58.135; our IP address is 192.168.58.21
Filename 'uImage'.
Load address: 0x1200000
Loading: #################################################################
         #################################################################
         #################################################################
         #################################################################
         #################################################################
         #################################################################
         #################################################################
         #################################################################
         #################################################################
         #################################################################
         #################################################################
         #
done
Bytes transferred = 3662635 (37e32b hex)
Now that we have our kernel uImage loaded in RAM at address 0x1200000, we can try and check if the kernel boots by issuing the following command:
Marvell>> set bootargs console=ttyS0,115200 earlyprintk
Marvell>> bootm 0x1200000
This should fail at some point (e.g. no root device) but this is a good test before proceding to the next section.
Step by step Debian install
Now that we have a kernel to boot on, this section documents in details a step by step install of a complete Debian. To start the install, you simply need to have a console access to the device and a way to pass the kernel and the Debian installer. As we previously did, we will use tftp. This could also be done via USB.
Booting kernel and Debian installer
Let's first grab a Debian armel installer image and put it atftpd folder, just as we previously did for our kernel image:
$ cd /tmp
$ BASE=http://ftp.fr.debian.org/debian/dists/squeeze
$ wget ${BASE}/main/installer-armel/current/images/kirkwood/netboot/marvell/guruplug/uInitrd
$ sudo cp uInitrd /srv/tftp/
Now (as we already did previously only for the kernel), let's load the kernel into memory ...
Marvell>> tftpboot 1200000 uImage
Using egiga0 device
TFTP from server 192.168.58.135; our IP address is 192.168.58.21
Filename 'uImage'.
Load address: 0x1200000
Loading: #################################################################
         #################################################################
         #################################################################
         #################################################################
         #################################################################
         #################################################################
         #################################################################
         #################################################################
         #################################################################
         #################################################################
         #################################################################
         #
done
Bytes transferred = 3662635 (37e32b hex)
and the Debian installer a bit further at address 2000000:
Marvell>> tftpboot 2000000 uInitrd
Using egiga0 device
TFTP from server 192.168.58.135; our IP address is 192.168.58.21
Filename 'uInitrd'.
Load address: 0x2000000
Loading: #################################################################
         #################################################################
         #################################################################
         #################################################################
         #################################################################
         #################################################################
         #################################################################
         #################################################################
         #################################################################
         #####################################
done
Bytes transferred = 3181036 (3089ec hex)
Let's modify the bootargs variable to get some console feedback.
Marvell>> set bootargs console=ttyS0,115200 earlyprintk
Note that we do not save the environment before booting the kernel and Debian installer
Marvell>> bootm 0x1200000 0x2000000
You should now see the kernel boot information and then the debian installer. At that point, you should be at home at home and continue the system installation process as if you were on a common system.
Building an uInitramfs (required for large disk w/ GPT partitions)
Once Debian install is over, you can reboot the NAS and use the process above to boot again the kernel and the Debian installer. This time, the idea is to get up to the partition manager so that all your partitions (raid, lvm, ext4) are set up and mounted. By executing a shell, we will create an initramfs and then install the kernel and this initramfs (as a replacement of NETGEAR ones on the NAND flash). So, from the Debian installer shell you can remount your disk. Below the root system is on a lvm volume - /dev/mapper/vgr-lvr - but yours could be on something like /dev/sda1 if you did something simple:
root@hal# cd /
root@hal# mkdir tgt
root@hal# mount /dev/mapper/vgr-lvr /tgt
root@hal# cd tgt
root@hal# mount -o bind /proc proc/
root@hal# mount -o bind /dev proc/dev
root@hal# mount -o bind /dev/pts proc/dev/pts
root@hal# mount -o bind /sys proc/sys
root@hal# chroot tgt /bin/bash
Let's install initramfs tools, build one ...
root@hal# apt-get install initramfs-tools
root@hal# mkinitramfs -o /tmp/initramfs-3.11 -r /dev/mapper/vgr-lvr -v
... , and make it understandable by u-boot:
root@hal# sudo apt-get install uboot-mkimage
root@hal# mkimage -A arm -O linux -T ramdisk -C none -a 0x00000000 -e 0x00000000 \
                  -n initramfs -d /tmp/initramfs-3.11  /tmp/uInitramfs
Commiting changes (uImage and uInitramfs) to NAND
At that point, we can either copy our uImage and uInitramfs to the NAND flash of the device or copy them to a USB key or even install those on the disk. Note that this last option is only available if your disks are small enough to not require a GUID Partition Table (GPT) partition (i.e. less that 2TB). Otherwise, u-boot will not be able to access the content of an ext2 or fat partition on the disk. Regarding the uInitramfs, it is needed in our case because the kernel is unable to directly autodetect recent RAID partition (if metadata is not v0.90).
Let's document the NAND flash way (another way would be to do it from u-boot via nand write command). Flash layout is the following:
root@hal:~# cat /proc/mtd
dev:    size   erasesize  name
mtd0: 00180000 00020000 "u-boot"
mtd1: 001a0000 00020000 "u-boot-env"
mtd2: 00800000 00020000 "uImage"
mtd3: 01800000 00020000 "minirootfs"
mtd4: 06800000 00020000 "jffs2"
So, we have 8MB available for kernel (ours is less than 4MB) and 24MB for our initramfs, respectively in /dev/mtd2 and /dev/mtd3. Let's install the tools ...
root@hal# apt-get install mtd-utils
... and install uImage (the dd and sha256sum stuff is to verify that our nandwrite command worked as expected) ...
root@hal# flash_erase /dev/mtd2 0 0
root@hal# nandwrite -p /dev/mtd2 /boot/uImage
root@hal# dd if=/dev/mtd2 of=/tmp/o bs=`wc -c /boot/uImage | cut -d' ' -f1` count=1
1+0 records in
1+0 records out
3664035 bytes (3.7 MB) copied, 0.736338 s, 5.0 MB/s
root@hal# sha256sum /tmp/o /boot/uImage
2ac3393ded6de2d37e6441260e1498ccdb1836a71552481e87d4a90eb9f84a37  /tmp/o
2ac3393ded6de2d37e6441260e1498ccdb1836a71552481e87d4a90eb9f84a37  /boot/uImage
... and then install uInitramfs ...
root@hal# flash_erase /dev/mtd3 0 0
root@hal# nandwrite -p /dev/mtd3 /boot/uInitramfs
root@hal# dd if=/dev/mtd3 of=/tmp/o bs=`wc -c /boot/uInitramfs | cut -d' ' -f1` count=1
1+0 records in
1+0 records out
2768752 bytes (2.8 MB) copied, 0.596774 s, 4.6 MB/s
root@hal# sha256sum /tmp/o /boot/uInitramfs
cdeb51f851b3967868fd52f2642283756ee42757690ba9596fc7a9f35ea9ea37  /tmp/o
cdeb51f851b3967868fd52f2642283756ee42757690ba9596fc7a9f35ea9ea37  /boot/uInitramfs
Commiting changes to u-boot environment
We can now reboot and once again interrupt the boot process to access u-boot in order to setup a final environment. In our case, as we installed the uImage and uInitramfs, we only need to modify the bootargs variable and use savenev to write u-boot configuration to nand:
Marvell>> setenv bootargs root=/dev/mapper/vgr-lvr console=ttyS0,115200 earlyprintk rootdelay=10
Marvell>> saveenv
Marvell>> boot
If you decide to go the USB way or install the uImage and uInitrd, you will have to modify root parameter and potentially other elements.
Notes on PaX/grsec support
If you intend to use the NAS as a server, you will probably configure and run a grsec kernel on it and may be interested by additional details on the topic. Bottom line: the processor being an ARMv5, it does not provide NX support (available from ARMv6): this means that some useful protection mechanisms provided by grsec patch will not be available (e.g. MPROTECT).
I spent some time configuring and testing a PaX/grsec-enabled 3.7.6 kernel for the NAS and diffing what is lost compared the same kind of setup on x86_64 platform. Pipacs was kind enough to provide some answers on how ARM support may evolve i.e. explain which x86_64-available feature which are currently missing on ARM may be supported at some point. Bottom line: pax/grsec support on ARM is expected to progressively match the level of "features" available on x86/x86_64 but on an ARMv5TE-based device, NX-dependent protection mechanisms will never be available.
In more details:
- GRKERNEXEC_RWXMAP_LOG (Denied RWX mmap/mprotect logging): depends on MPROTECT which depends on NX which is not available on ARMv5.
- PAX_KERNEXEC (enforce non-executable kernel pages): this option is not yet available on ARMv5 and would require some porting effort.
- PAX_MEMORY_STACKLEAK (Sanitize kernel stack): not available yet on ARM but feasible, i.e. may be available in the future.
- PAX_MEMORY_UDEREF (Prevent invalid userland pointer dereference) : already available on ARMv6+ since 3.8 kernel. Might be available at some point for ARMv5.
- PAX_PAGEEXEC ( Paging based non-executable pages): will not be available on ARMv5.
- PAX_NOEXEC (Enforce non-executable pages): depends on PAX_PAGEXEC, so will not be available on ARMv5.
- PAX_MPROTECT (Restrict mprotect()): same as previous.
- PAX_MPROTECT_COMPAT): same as previous.
- PAX_RANDKSTACK (Randomize kernel stack base): doable on ARM but currently not worth the effort.
- PAX_REFCOUNT (Prevent various kernel object reference counter overflows): already exists for ARMv6+ and feasible on older ARM but not yet implemented.
- PAX_SIZE_OVERFLOW (Prevent various integer overflows in function size parameters): arch independent but nonetheless require some ARM specific function. May get available at some point .
Additionally, if you are interested by the topic, you should read Recent ARM security improvements article on Spender's blog.
Automatic fan control based on NAS temperature
After having installed fancontrol package ...
root@hal:/sys/bus/i2c# apt-get install fancontrol
... , you first need to run pwmconfig to create an initial configuration referencing the temperature sensor and the fan controller, and the various temperature and fan rotation limits. You will end up with a configuration file (/etc/fancontrol)like the following (stock 3.11 kernel):
root@hal:/sys/bus/i2c# cat /etc/fancontrol
# Configuration file generated by pwmconfig, changes will be lost
INTERVAL=10
DEVPATH=hwmon0=devices/ocp.2/f1011000.i2c/i2c-0/0-003e hwmon1=
DEVNAME=hwmon0=g762 hwmon1=kirkwood_thermal
FCTEMPS= hwmon0/device/pwm1=hwmon1/temp1_input
FCFANS= hwmon0/device/pwm1=hwmon0/device/fan1_input
MINTEMP= hwmon0/device/pwm1=25
MAXTEMP= hwmon0/device/pwm1=45
MINSTART= hwmon0/device/pwm1=50
MINSTOP= hwmon0/device/pwm1=45
MAXPWM= hwmon0/device/pwm1=200
Obviously, you may change the configuration (e.g. modify MAXTEMP and/or MAXPWM values) based on your needs (noise vs SoC temperature).
As a side note, I do not go here into the details of the fan driving mode (PWM vs DC) and the fan speed control modes (manual i.e. open-loop and automatic i.e. closed-loop) the g762 fan controller supports. By default, Netgear's u-boot puts g762 driver in manual fan speed control (/sys/bus/i2c/drivers/g762/0-003e/pwm1_enable is set to 1) and DC mode (/sys/bus/i2c/drivers/g762/0-003e/pwm1_mode set to 0). Addditional information is available in kernel g762 documentation (Documentation/hwmon/g762).
Configuring custom actions for buttons
If you want to trigger custom actions using the power, backup and reset buttons, you can probably use this script as a basis.